
Hammer Time
Divine Beast Vah Rudania and the Element of Fire


WARNING! SPOILERS for The Legend of Zelda: Breath of the Wild and Tears of the Kingdom beyond this point!
Good afternoon, my friends—and welcome to the conclusion of my coverage of the Freeing of the Divine Beasts in The Legend of Zelda: Breath of the Wild!
It’s been one hell of a journey, and one whose twists and turns I could not have foreseen at the beginning when I first created the new User Profile for Gogo Bordello on my Nintendo Switch. This four-part miniseries on the Divine Beasts was not even a thought in my mind. Little did I realize that by the time I finished the quest, I would understand secrets regarding The Hylian Banishing Ritual (HBR) that I could scarcely dream of at the time—and I would be sharing them all with you! In ways equally unforeseen, that fits well with the themes we’ll be covering in today’s post; the material I’ll be covering here was nowhere near fully clear to me when I set out to complete the in-game portion of the “ceremony” being documented here, and I proceeded with faith that the journey itself would reveal what it needed to reveal to me. This is actually an aspect of the card we’ll be discussing: The Hierophant. That is, one lesson of the Hierophant is that we learn best by teaching. This post illustrates that lesson beautifully.
In our previous post, we left Link where the game places him upon the freeing of Vah Medoh: Revali’s Landing in Rito Village. My initial plan was to paraglide from here down to Rito Stable on the mainland below, where my horse waited for me, and then ride through Hebra, across the northern section of the map to the Eldin region.
There’s a stop to make on the way down; one of the smaller rock needles surrounding the main spire of Rito Village greets Link with a stone sitting on top of it, and if Link stops to lift the stone up, he’ll reveal a Korok who’ll give him a Korok seed. I always do that next, and did so again.
That’s when I noticed it: The circular, stone platform to the south that is used to call forth Bareeda Naag Shrine. That’s part of a quest that I forgot to grab this time, normally picked up from Bedoli up on Revali’s Landing. That’s okay; the whole purpose of the quest is to learn how to reveal the Shrine, and I already knew how to do it. I checked the position of the shadow cast by the spire rising through Rito Village, and it was conducive to timely completion of the quest, so I decided to just do it, then circle back and “pick up the quest” after doing it…kind of like I usually do with the quest to light the furnace at Hateno Ancient Tech Lab.
For reference, the quest in question is called The Ancient Rito Song; in short, Bedoli is trying to remember a full song, and she sends Link to go talk to her friend, Laissa, who knows the lyrics. Laissa sings Link the song, and it’s up to Link to solve the puzzle based on its clues. Here’s the song:
The Pride of Rito, pillar in the sky,
its heart lights up, when the sun is high.
The heart shines upon a path not whole,
but a warming flame can stir its soul.
What’s the solution?
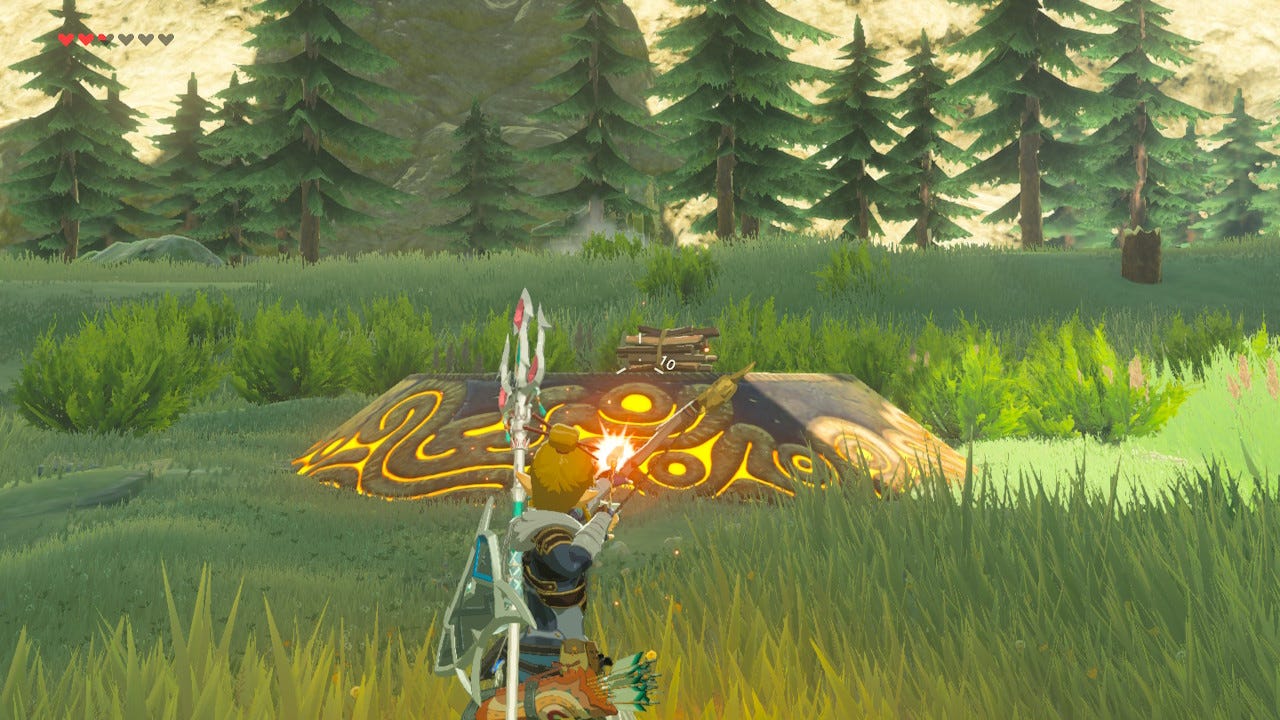
Rito Village is built in a spiral that rises around a large rock pillar which is situated in the middle of Lake Totori—the same one atop which Vah Medoh now perches. Each day, the sun shining down onto this spire effectively turns the area around the lake into a giant “sundial.”
There’s also a hole running right through the middle of the spire—incidentally, shaped just like a heart.
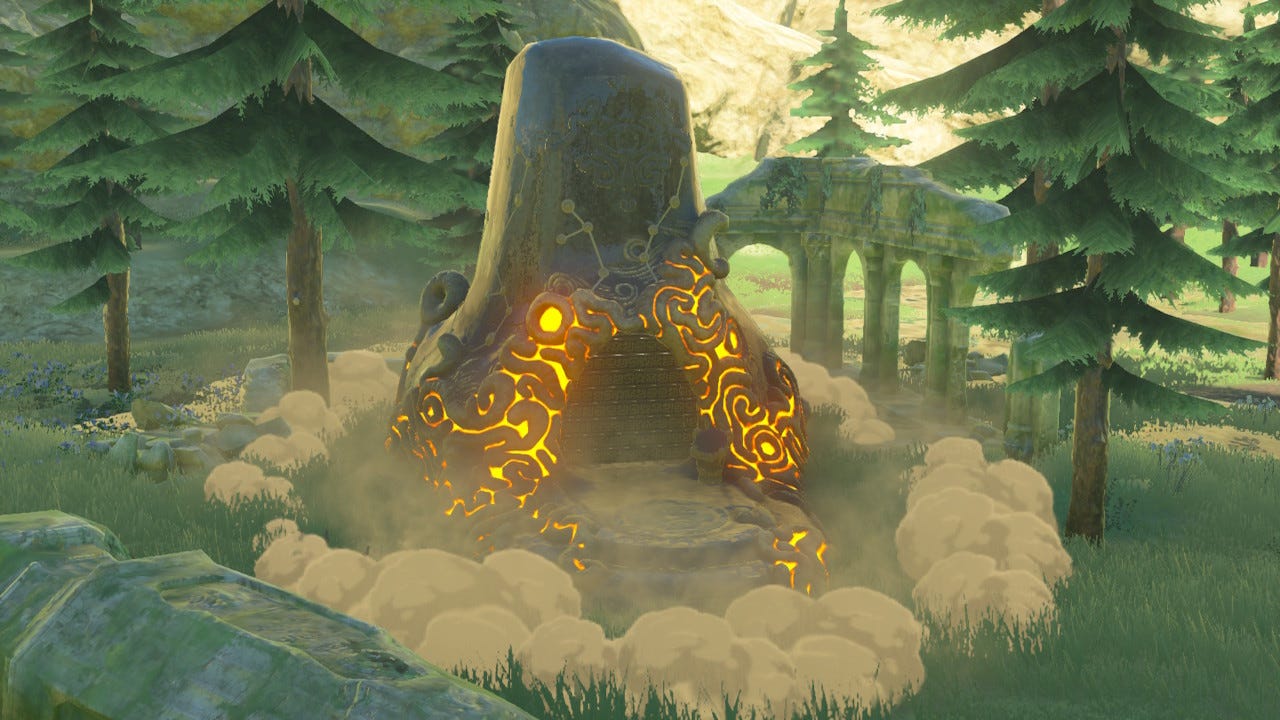
At just the right time each day, the sun shines through this hole and directly onto the circular platform. According to the clue from the song, at that moment, Link needs to “warm” the platform with a flame—one way or another. I usually just toss a bundle of wood onto it and hit it with a fire arrow when the time is right. The platform will glow when the window is open to activate the Shrine. Once some fire touches the platform, the Shrine rises up from the ground in the middle of some nearby ruins.
The name of the Shrine Quest in Bareeda Naag is “Cannons,” and it’s pretty fun. It was also quite revealing this time around.
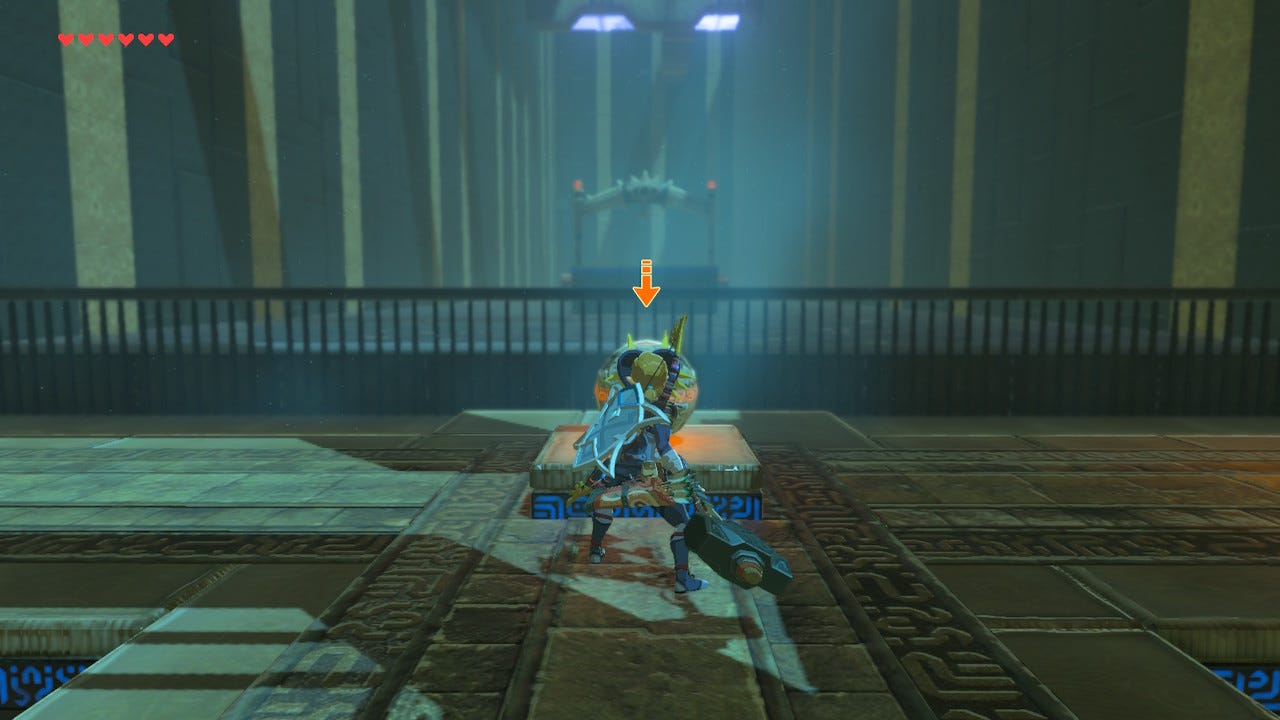
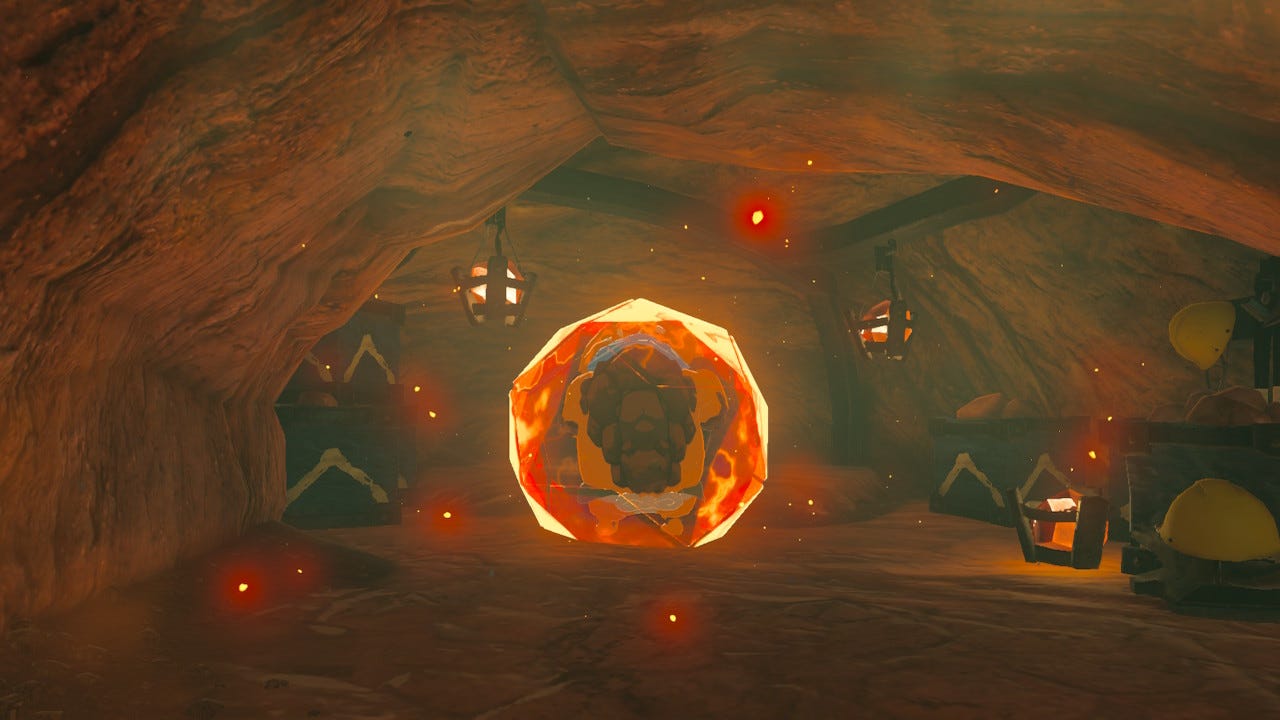
There is a giant, “steampunk” cannon in the middle of the room with a funnel leading into it. Link has seen these before. In fact, he first saw them in the very Shrine where he first received the Bomb rune, in another context I have already likened to space travel.
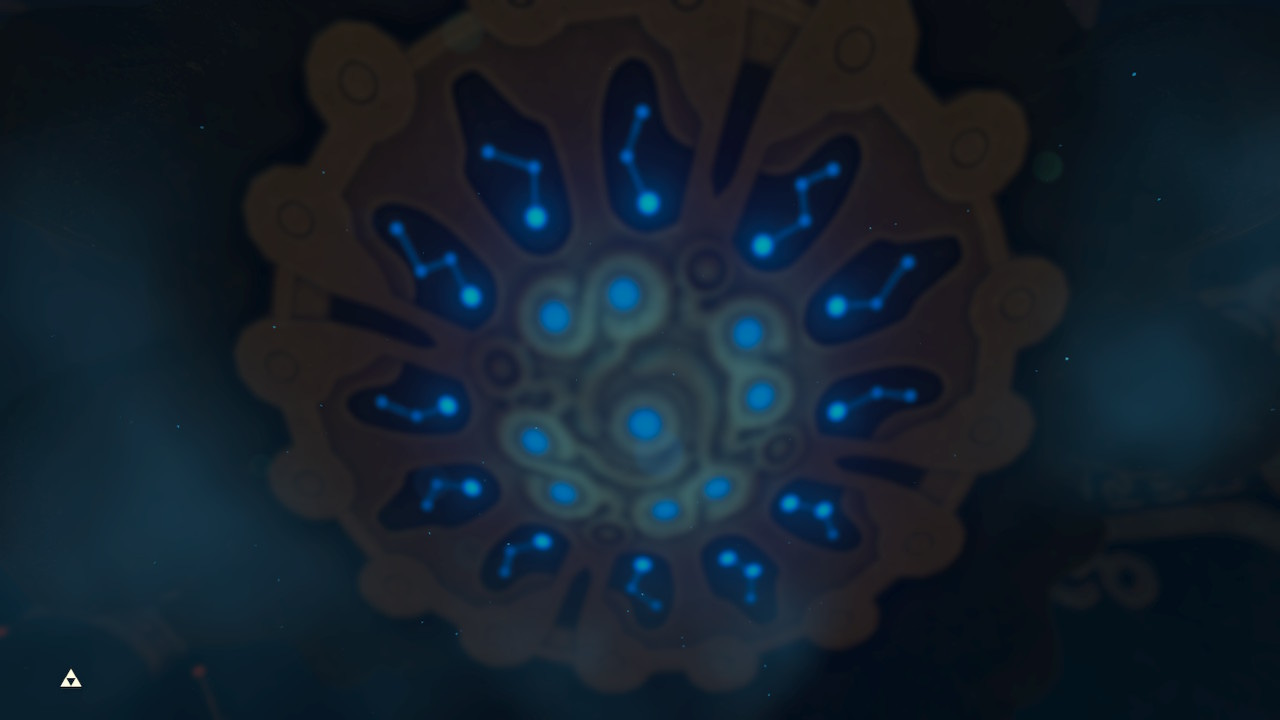
If he drops a Sheikah Bomb down into the tube and detonates it, the cannon will fire. As Link looks up, he sees a glowing, orange target. In between Link and the target is a staggered series of floating stone platforms, each moving at a different speed. They’ll block the cannon’s projectile; the idea is to get the timing right so that the cannonball hits the target. But…I can’t believe I never noticed this detail before. Here, take a look, and then I’ll explain:
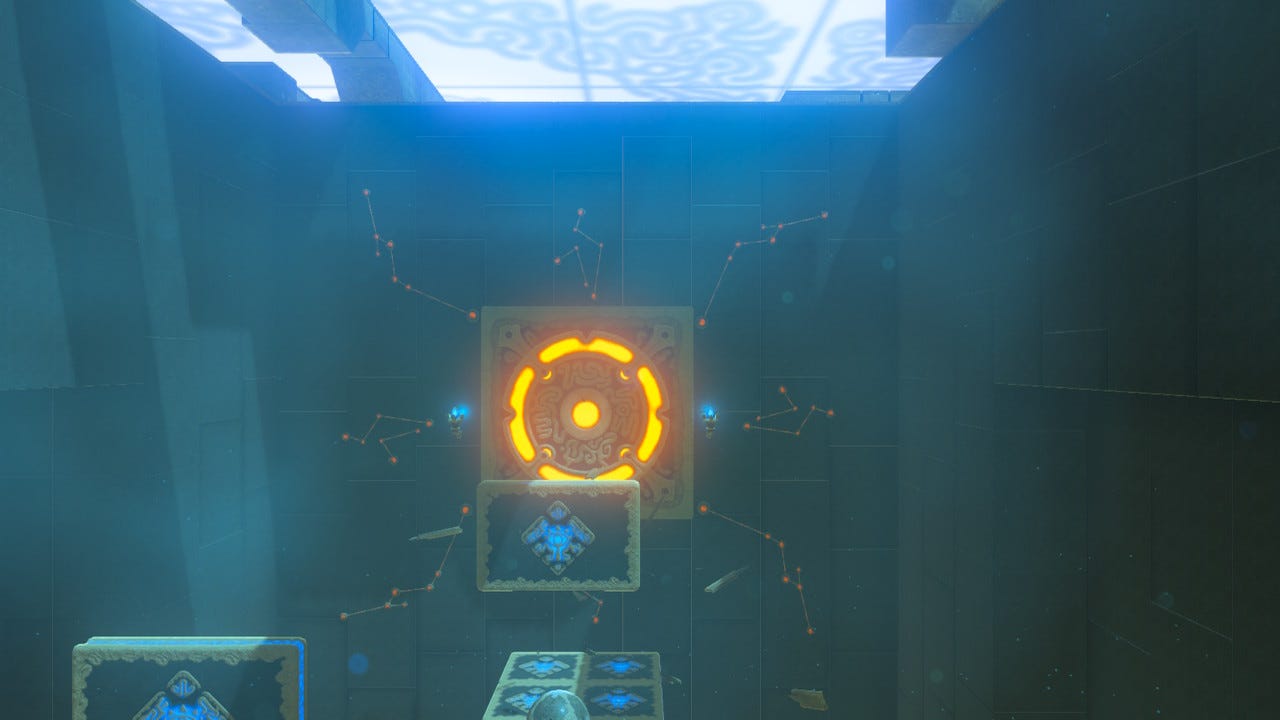
Wow. Wow. Wow.
Do you see the designs arranged on the wall around the target, made of dots and lines? You might be able to tell just by looking at them, but those are, indeed, constellations—and seeing them here, arranged like this, in this specific context, was…striking.
This touches on the “central Mystery,” as I have often seen it, of this entire game—and by extension, the HBR. It is hinted at in the very beginning of the game, when Link first wakes up in the Chamber of Resurrection and we’re shown the ceiling of the pod he’s been sleeping in for 100 years. I used it for the banner image for the post Right On Time, my New Year’s Day post for 2023:
I see this meaning two different things—each of which may be more closely related than I know (I still have a lot of research to do).
Firstly, there’s the original meaning I associated with this image: A clue to connect the Four Divine Beasts to the “Four Living Creatures” of the Zodiac. In other words, these are the Fixed Signs of Aquarius, Taurus, Leo, and Scorpio. I would imagine that pretty much any Ceremonial magician playing this game would automatically make this association, along with not a few seasoned tarot readers. Why? Because we see the symbols of these four signs on several of the Major Arcana Trumps of the Tarot, including Key X: Wheel of Fortune and Key XXI: The World. In the Thoth Tarot, we see it in one additional card that I’ll be discussing eventually.
At the North Pole, the four quarters of the sky all come together—each one “anchored” by one of the Fixed Signs—and that, in a nutshell, is what we’re looking at up there: The northern sky, and the cross formed by the meeting of the four quarters.
However, the detail-oriented will note something about both the image above and the one from the Shrine: While each one depicts numerous constellations “radiating” out from a center, each separate image only contains two unique constellations, which then repeat themselves as they circle the center of their respective images.
What gives?
I’ll show you exactly the image that came to mind when I noticed these constellations this morning. It ties to the symbolism I discussed in the previous post, A Bird’s Eye View, in connection with the Seven Heroines of the Gerudo Desert. As I explained, the Seven Heroines, who are really Eight, correspond with the seven stars of Ursa Major—the constellation known to modern Westerners as “the Big Dipper,” but which was known to the ancient Egyptians as the Thigh of Set. In the Gerudo Desert, the Seven Heroines are arranged in a near-complete circle, with only the Eighth Heroine missing, and I discussed the “Goddess” symbolism here as being related to the “womb” that is the Abyss. The 8th star, of course, represents Set himself—being “born” from the “womb” of Ursa Major. According to the myth, Set was not passively birthed, but instead cut his own way out of the uterus, which is key to his symbolism as a self-created “neter” (the Egyptian word for what we call a “god,” which means roughly a living “principle” that presides over its given aspect of the cosmos).
This does not symbolize just any old, run-of-the-mill birth; this is a symbol for the rebirth into eternal life that is the major culmination point of Initiation; and this circular arrangement of repeating constellations is an allusion to the Egyptian stellar afterlife cult which held that we aren’t all automatically immortal. Under normal circumstances, even those who have lived the best lives are composed of a number of soul-parts—in the system taught by Don Webb in How to Become A Modern Magus, the total number is 8 (fancy that)—which, over time, will decompose just like the physical body over time, returning to nature. This is the meaning of Set as being “self-birthing:” To achieve immortality according to the practices of this stellar cult involves a prolonged exertion of Will. One must work for it. In fact, not everyone has all 8 of the above-mentioned soul parts! The Akh—the “effective body,” or the part which survives into the afterlife—is created through a synthesis of the other parts. Upon death, it leaves the body to travel the stars—and it does so via Ursa Major, which functions as a “gateway” for the soul to travel out into the wider universe.
This function as a “gateway” makes the constellation analogous to a “birth canal into eternity,” which is where all of this feminine, menstrual, and womb-related symbolism comes from.
Throughout the year, the seven stars of Ursa Major circle about the fixed point of Polaris—the North Star—which is the “8th” associated with Set. As it does so, if one were to take a snapshot of the northern polar sky at four fixed points throughout the year—the Solstices and Equinoxes—and superimpose the four images, the result would take the form of a swastika. As we discussed in Threading the Eye, this is by no means the only esoteric meaning of the swastika—but it is said to be one of them.
The image below, illustrating this, was stolen from Jodi Childs on Facebook (iykyk), who shares it pretty regularly.
A note regarding the diagram: This concept has sometimes been “debunked” by science-oriented sources in good faith. I would never dream of them stopping what they’re doing and I’m glad they’re doing it, because it’s not uncommon for white supremacists to use pseudoscience to shoehorn their racist ideologies into things, and we should use skepticism and rationality to combat that. Not to mention, those things are good regardless of their role in combating authoritarianism.
These sources say that the association of Ursa Major to Polaris is arbitrary and derived from the fact that two of the stars almost form a straight line with Polaris if you’re squinting and looking for it. These sources say there is no other association between the two. These sources are generally not familiar with the esoteric teachings surrounding these stars that have been discussed in the present work. We have very good reason to link to two.
One drawback of this diagram is that it does seem to suggest that this is the basis of all swastika imagery worldwide, and I am not saying that. I don’t think that holds water. However, the swastika is a common symbol because of its solar significance, and I think that knowledge is well worth preserving. I also just think this diagram looks nice. As long as I’ve included the clarifications above, I feel alright about using it to illustrate this.
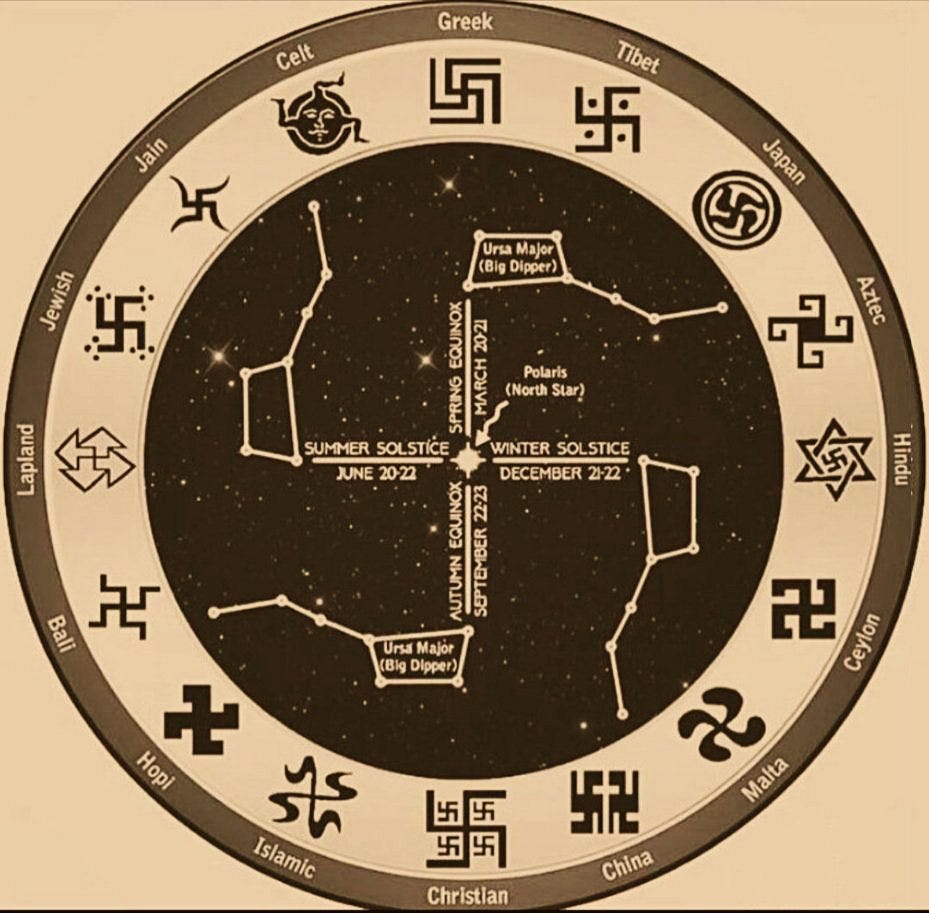
In The Great Pyramid at Giza, the shaft leading from the King’s Chamber was said to have been built to align with Ursa Major for this reason—to guide the Akh of the pharaoh to the afterlife.
This is basically what’s being illustrated by the central objective of this Shrine; we had to shine a heart-shaped sun ray onto a sacred platform in order to sanctify a flame burning upon it so we could even get in here; especially after the connections I made between Rito Village and Maat in the previous post, this screams “Successful Weighing of the Heart;” then we come in here and fire a cannonball into a target in the center of a representation, ostensibly, of Hyrule’s northern polar sky, propelled by a Bomb which I have previously associated with the energies (being highly spiritual) of Jupiter.
I know I’ve said this several times before, but: I don’t think any of this symbolism was accidental.
All Sheikah Shrines contain at least one treasure chest that can be collected, and this one is no exception. I did pretty well, hitting my target on the first attempt (it’s not as hard as it looks). I could complete the Shrine and leave at this point if I wanted to; but there’s an extra room just past the Sheikah Monk here, with another cannon and another target. This one is harder to hit, but there’s a prize. This one took me two tries this time.
The prize for winning is a Diamond, which to me only underlines the esoteric symbolism of the rest of the Shrine; after all, “a diamond is forever,” right? Like gold, diamonds are sometimes used as a symbol of immortality and spiritual perfection, of incorruptibility. How does the song go?
Twinkle, twinkle little star
How I wonder what you are?
Up above the world so high
Like a diamond in the sky…
To The North
I thought it was pretty fitting for this to happen just prior to my departure for my journey to the Divine Beast of the North, Vah Rudania.
I’ve been somewhat nervous about this stop on the journey. As we’ve explored in various posts, the elements work strangely here in comparison to what most magicians and witches will be accustomed to, because the game names Vah Rudania’s element “Fire,” but the entire surrounding region and the people associated with it are suffused with symbolism normally connected with the element of Earth; meanwhile, there’s no other element offered in the game that fills that same niche even halfway as well.
The element of Earth as it appears here is thus rather complex, and I’m honestly not the person most in-touch with the element of Earth even in the simplest sense. Ironically, my strongest element is the one that is here being so blatantly overridden with Earthen vibes: Fire. This only adds to how elusive the Mysteries of the Hylian North can be for me. Fortunately, taking this very journey has expanded my horizons, leading to the understanding I needed in order to weave this entire project together. I had been concerned about the end result, but it’s even more rewarding and breathtaking than I had ever dared to dream. All of this fits together very well and I am proud of myself for following my intuition to this place.
From Bareeda Nag, I warped back to the main Shrine in Rito Village, named…are you ready for this?
Akh Va’quot. “Akh.” This is the “Windmills” Shrine from the previous post.
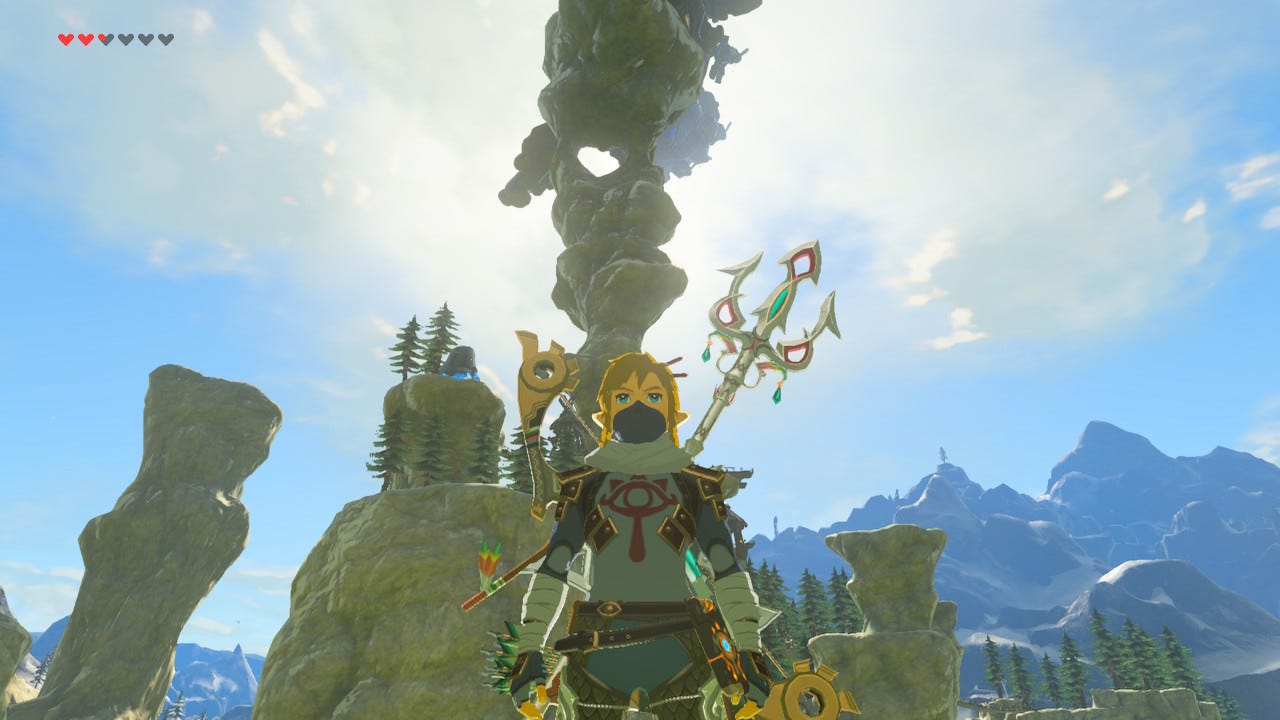
I warped there because from there, it’s easy to get back onto Revali’s Landing so I could continue down to my horse. Of course, I needed to stop to pray at the Shrine of Hylia, so I landed on one of the mesas just outside of the village. I smiled, seeing an Iron Sledgehammer leaning up against a rock wall. I threw my old one out and picked this new one up (it’s never fun to wear a hammer down in the middle of harvesting ore, so it’s better to replace an old one before it’s even necessary). Also, the symbolism of the “hammer” made me feel like things were going to work out. I’ll explain soon enough. For now, as Link hops onto his horse and heads toward the snowy Hebra region, let’s talk theory. We’ll use this concept of the Akh traveling the stars as our jumping-off-point for discussion.

Firstly, I should make it clear that I am no expert on ancient Egyptian religion, myth, symbolism, or cultural practices. I know a thing or two, a small smattering of what any typical Western occultist is bound to pick up simply due to to how much of Western occultism is based—however loosely it may prove to be in any given case—on Egyptian magic(k). I don’t go out of my way to learn about Egypt like some people do, though. My knowledge is admittedly spotty.
Nonetheless, I think the whole concept of the afterlife as expressed in the stellar cult in question here is interesting, and it’s something that might come across as counter-intuitive to someone who hasn’t done much esoteric study; the whole way there’s an apparent “science” behind this stuff, where a specific constellation has to be used as a “gateway” might seem strange to someone who imagines ghosts just kinda…going wherever they want, even through walls. The ventilation shaft of the King’s Chamber, in this scenario, suddenly seems almost like a “launch pad” for the Akh, right? And just like a normal rocket ship, it has to be properly aimed, the ceremonies must be observed, things all have to be lined up advance and all go smoothly in order for this journey to work out.
The parallels are fascinating, really.
The formula of Initiation via the Qabbalistic Tree of Life shares many of those parallels, and I imagine it’s because there’s a historical connection between Qabbalistic and ancient Egyptian Initiatory teachings. I’m sure many of my readers are already familiar with the basics of the Qabbalah, but for anyone who isn’t and for the sake of narrative:
The Initiate starts at the bottom of the Tree of Life, with their consciousness fully encapsulated in Malkuth, the bottom “Sephirah.” A Sephirah is a center of some essential aspect of consciousness (which is also, at the same time, a center for the corresponding essential aspect of the entire universe). There are 10 Sephiroth, which are interconnected by 22 “Paths.” Each Path is in turn associated with one of the Major Arcana Tarot Trumps. Aside from Malkuth, each Sephirah is associated with a planet in our solar system. To “move” from one Sephirah to another is to undergo a shift from one level of consciousness to another, and the character of the shift will be determined by the Path in question and its various attributions, the primary one of which is its Tarot Trump. As one moves higher and higher up the Tree of Life, the planets represented by the Sephiroth grow farther and farther away from Earth. Thus, the Sephiroth highest up on the Tree—the “highest levels of consciousness”—are also the farthest from Earth.
Thus we have yet another “space voyage:” The journey along the Path of Initiation—the journey of the growth and development of the soul—is enshrined in the metaphor of the journey into outer space. The farther “out there” we go symbolically, the deeper into the Self we’re going in terms of our experience.
The journey by and large proceeds apace from one planet to the next, with one major event at the center of the earlier stages—that step associated with the Sun—which is the stage known as attaining the “Knowledge and Conversation of the Holy Guardian Angel.” After this, there is the Sephirah of Geburah (corresponding with Mars), then Chesed (Jupiter), and then something notable: The Abyss. The Abyss is visually demarcated by a “gap” between the upper and lower portions of the Tree of Life, but there’s one other notable marker of this boundary:
From Malkuth to Chesed, there are Paths available making it possible for the Initiate to travel from one Sephirah to the next in a neat, sequential order (plus additional Paths to facilitate movement back-and-forth and to-and-fro throughout the lower section of the Tree).
However, there is no individual Path leading directly from Chesed—the 4th Sephirah—across “The Abyss” to Binah, the 3rd Sephirah, which is associated with Saturn (notably, the farthest known planet for most of human history).
Anyhow, this situation puts the Initiate in a predicament; the only way forward involves a journey through dark, uncharted waters. In the immortal words of Gloria Anzaldúa: “Voyager, there are no bridges; one builds them as one walks.”
This is not to say there are no paths across the Abyss at all—there are, in fact, 5 of them in total. However, not a single one of those paths is a smooth transition from the state of consciousness associated with Chesed to the one associated with Binah—and that’s important, because that specific transition is at the very heart of Crossing the Abyss. The problem with any one of the 5 Paths that do cross the Abyss is that they are even more complicated than the essential transition faced by the Initiate at the threshold of the Abyss.
Let’s make an example out of the one I know best: Path 18, the Path of Cheth, associated with The Chariot.
This Path directly connects the Sephirah of Geburah with that of Binah, which, pictographically, looks simple enough:

The problem is that just because we don’t see the Sephirah of Chesed in this image doesn’t mean it isn’t involved. Path 18 must pass through Chesed to get to Binah—at least in a sense. It may look like it, but this path is not really a shortcut. Things don’t really work that way, just as you can’t reach Saturn from Mars without traveling past Jupiter first.
What does this mean for Crossing the Abyss? I come up with two major take-aways:
There’s no map for Crossing the Abyss, no one-size-fits-all formula, and everyone’s experience of it will be unique.
Nonetheless, it means that rather than following one path across the Abyss, we end up weaving all 5 of them together.
Regarding the second point, I expressed something similar in a post a few months ago: That since the Abyss is the part of the Tree where everything sort of “scrunches up” and all sense of separateness and distinction disappears, the logical conclusion is that all 5 paths are, in a sense, one. This not only made sense to me logically, but also rang true to my personal experience of the Abyss—but I wasn’t sure how “kosher” the notion was in terms of, say, being acknowledged in any existing teachings.
I forget now which post it was, but one of Lon Milo DuQuette’s daily YouTube talks this week covered this: He literally said that all 5 paths across the Abyss “radiate outward from Binah.” So yes, in a sense I was correct: It all sort of gets rolled up into one mind-melting transformation that is so complex, it needs to be explained from 5 separate perspectives (at least) in order to be properly understood. A thorough and genuine process of Crossing the Abyss thus takes all 5 paths into account. I think different people have different experiences nonetheless, i.e. different people are more or less conscious of one aspect of the journey vs. others depending on what they need to focus on or develop the most; I know I personally favored The Chariot and The Lovers. However, just as there’s no avoiding Chesed to get to the Abyss in the first place, there’s no avoiding any of the Paths if you want to make it all the way across.

The 5 Paths across the Abyss are as follows:
Path 18: The Chariot connecting Geburah to Binah
Path 17: The Lovers connecting Tiphareth to Binah
Path 13: The High Priestess (most direct path) connecting Tiphareth to Kether
Path 15: The Star (alternately The Emperor) connecting Tiphareth to Chokmah
Path 16 The Hierophant connecting Chesed to Chokmah
The following comment generally holds true for the entire Tarot as a whole, incidentally, but it’s even more true in this particular circumstance: There is a lot of redundancy between the 5 above Paths—that is, each one covers the same ground in different ways, and that common ground they all hold is important, sacred ground (it’s all sacred, but this is somehow more sacred still), so themes repeat. Nonetheless, there is also something about each perspective that is absolutely unique.
The card I want to zero in on at this point is the one I don’t think I’ve mentioned even once before it showed up here: The Hierophant. As I mentioned above, that’s because I’ve discussed all the others at one point or another, but this one has been left out. Secondarily, I’ll be drawing particular contrasts between The Hierophant and The Chariot, and it makes sense that I would do so because the two stand on opposite sides of the Tree to one another, which means they directly mirror one another. We’ll see this borne out.
In preparing for this leg of the game, I did some review on The Hierophant because my ruach—my rational intellect—was concerned about how well I’d be able to weave that Path into the picture at this late hour of our magi(k)al working. It turns out my ruach needn’t have worried, because it fits like a glove—and that hammer outside of Rito Village was the first sign.
The word “Hierophant” is basically a synonym for “Pope,” and that’s the figure traditionally depicted on this card. There will actually be two connections between Popes and hammers by the time I’m done writing about this game. The first, however, is the longstanding rumor that the death of a Pope is traditionally confirmed by striking his head three times with a silver mallet. There’s no evidence for this and the story is likely apocryphal, but hey, there it is.
The Hierophant is ruled by the sign of Taurus—which, the reader may recall from above, is one of the four Fixed signs of the zodiac: Specifically, fixed Earth. This fits better than I could ever have hoped for with the Elemental symbolism of Divine Beast Vah Rudania. Not only did I not have to worry about fitting The Hierophant in here, but even better: The very nature of the card and the Path it represents saved the day and provided the best explanation for how and why Fire and Earth are “co-inhabiting” the North in Hyrule.
I’ve touched on this idea elsewhere, but it’s worth revisiting the notion, in Western esotericism, that the four elements can be “ranked” in terms of how “spiritual” vs. how “material” they are. Earth, unsurprisingly, is considered the “most material” and thus “least spiritual” element. Meanwhile, Fire is considered the “most spiritual” and “least material” element, to the extent that in many magical and spiritual contexts, fire is the element that transforms matter into spirit; many offerings have traditionally been burnt, the material of the offering being transformed into a spiritual offering as it burns.
So we have this basic assumption of Fire=”highest”, Earth=”lowest” which is very common among Western occultists; there’s another basic concept that comes to mind which is related, and I want to apply it to this scheme of the elements. It’s another one well-known by those who study Qabbalah:
“Kether is in Malkuth and Malkuth is in Kether, but after another manner.” Kether is the “highest,” most spiritual Sephirah while Malkuth is the “lowest,” most material one. What this axiom is saying is that even so, Malkuth is the direct reflection and embodiment of Kether, and Kether is thus the highest “seed” of Malkuth. They’re not only like opposite sides of the same coin, their connection is even deeper and more essential than that somehow. The two have more in common with one another than the two sides of one coin do, although each one is somewhat the “opposite” of the other as well.
The combination of Fire and Earth in the North is basically saying the same thing.
I’ve seen this same principle expressed in one other place today, which I’ve already mentioned in this post: In How to Become A Modern Magus: A Manual for Magicians of All Schools by Don Webb, there’s an entire section of the book dedicated to Egyptian soulcraft—to the exploration of the 8 parts of the soul in ancient Egytian magic(k).
The last of the chapters—named after Set—discusses two “opposite” soul parts: The Kat, or the physical body, and the Akh, or “the effective body”—the body one uses to travel the stars upon achieving immortality.
All of this same symbolism is reflected in the card of The Hierophant: Ruled by a fixed Earth sign like Taurus, the connections with the element of Earth are undeniable, and there are a few different angles from which to consider this, one of which being the considerable worldly power once wielded by the Pope (and even today, though it be considerably diminished by comparison, his influence is nothing to sneeze at). In Crowley’s version of the card, these connections to Earth become even more pronounced as the traditional pontiff is replaced by a Sumerian priest-king, his two male servants replaced with the Scarlet Woman, a representative of “Venus Militant.” This is a highly passionate, sexual, carnal card. By the way, I had mentioned earlier that I would be discussing a card to which The Four Living Creatures had been added as visual elements, and this would be it.
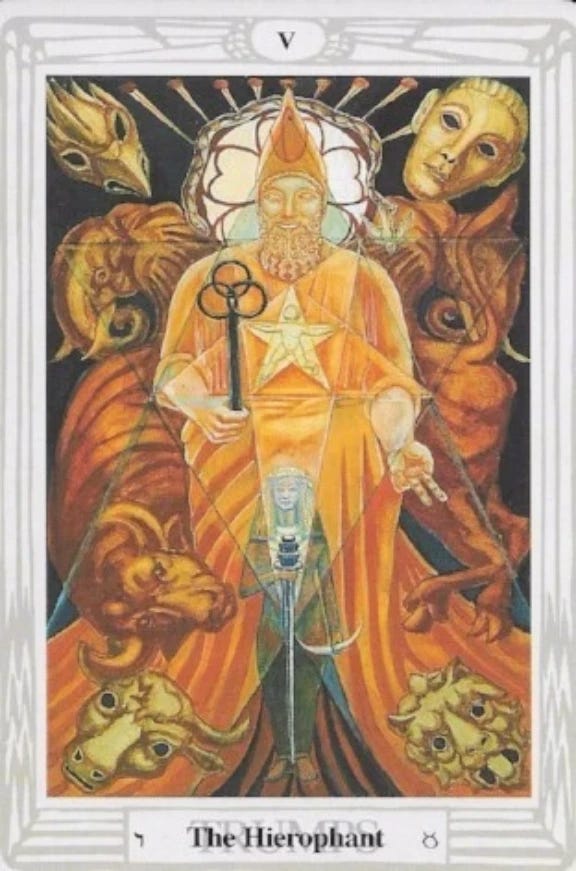
Nonetheless, whether we’re examining the worldly power of the Hierophant or the vigor and poise of the Babylonian Priest and his Scarlet Woman “girt with a sword,” there is a stark contrast between these worldly elements and the inherently high spiritual office of both men. Further, in the Thoth version (shown above), we see symbols of both the microcosm (the pentagram upon the Priest’s chest) and the macrocosm (the semitransparent hexagram traced around the Priest), symbolizing the union of the two; in other words, this is a card emphasizing the embodiment of consciousness in flesh and the carrying out, in the world of matter, of its True Will.
Most importantly, note that I did not specify whose consciousness we’re talking about here. Is it an individual? Or am I speaking in cosmic terms? The presence of both microcosmic and macrocosmic symbolism is telling us it’s both. On Path 16, the major lesson is that between spirit and matter and between one soul and the entire universe, there is no fundamental distinction. It is a reminder to us to get “back to basics” with regard to our Hermetic theory, to the most fundamental tenet from The Emerald Tablet of Hermes Trismegistus:
It’s all “one thing.”
As we’ll see (and as I expressed in very different terms above), this is not the fundamental truth of The Abyss, this is just one aspect of it. Meanwhile, the message coming to us from the opposite side of the Tree, as we might suspect, almost directly contradicts this one. That’s another way of saying that it’s looking at the same thing from the complete opposite angle.
Playing the Field
Woodland Stable is located at roughly the halfway point on Link’s journey from Rito Village to Goron City in Eldin, the region surrounding the highly volcanic Death Mountain. I rolled my eyes at the universe for “hammering” its point home when I realized which Shrine is located across the nearby pond from the stable: Mirro Shaz, with its trial, “Tempered Power.” It’s not one of my favorites, because it relies on skill with the Stasis Rune. Link needs to cast Stasis on a sphere, then pound on it with a sledgehammer to knock it across some water and into a bowl across a large chamber from Link. It’s like “Putt-Putt,” but with Stasis.
And of course, there’s a chest in here with another sledgehammer.
This is another Shrine where there’s an additional, harder version of the main puzzle just past the Sheikah Monk, for the extra adventurous—but seriously, all I usually end up doing there is breaking all my hammers without winning. I took my hammer and walked.
The innermost region of Eldin—closest to Death Mountain—is prohibitively hot. Like, Link-will-get-roasted-without-protection hot. This is one of the ways in which the North and South in Hyrule are different, but yet too similar, and it relates to how redundant the elements of Fire and Thunder feel without making it a point to emphasize the North’s Earthen aspect: Down in Gerudo, it’s hot enough during the day that Link will take damage without wearing special equipment specifically meant to cool him a bit. Up in Eldin, he must wear different equipment still, because it’s so hot it’s on a whole other level.
Catch-22: You need to go to Eldin to get that equipment.
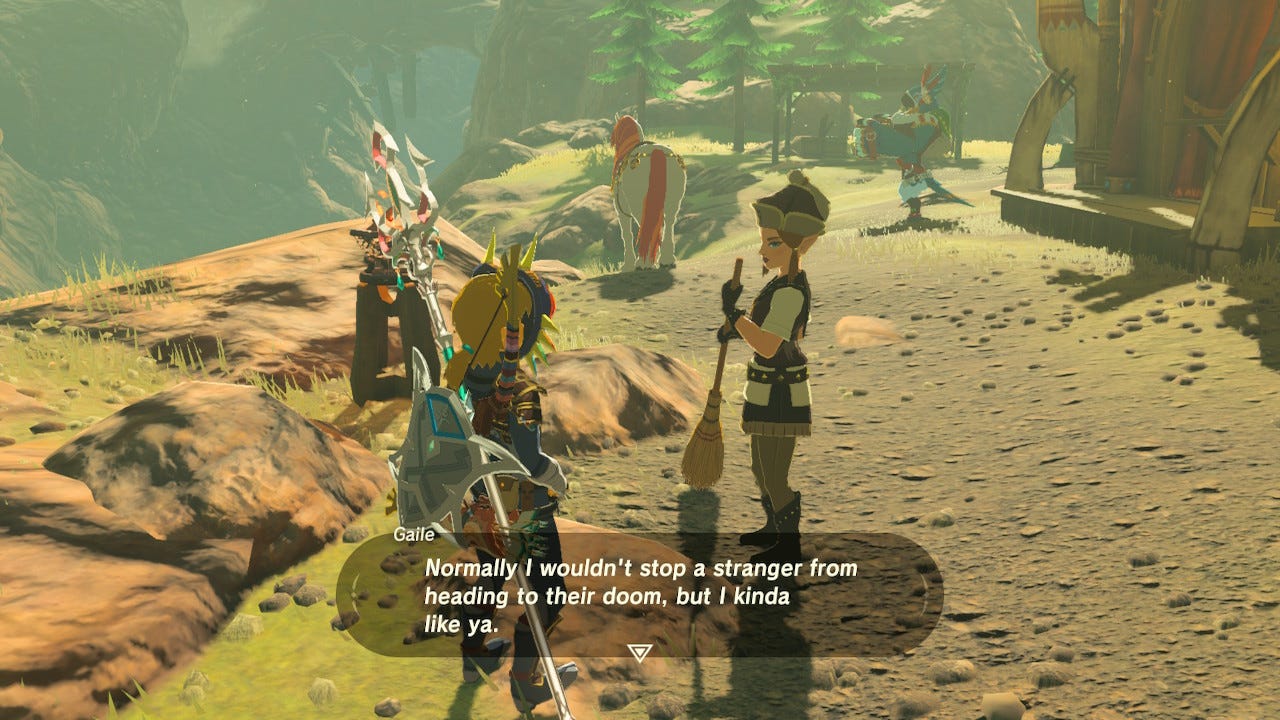
Solution? Well, at Foothill Stable, there’s a gal named Gaile who sells Link some Fireproof elixir. It’ll be just what he needs to reach Goron City safely.
Tricks of the trade: The Flamebreaker Armor is expensive, so anything you can do to reduce the cost is desirable. As Link nears Goron City, he passes through Southern Mine, and there’s a guy here named Kima who wants 10 Fireproof Lizards (the primary ingredient in Fireproof Elixir, if you’re wondering why he wants them). They are not difficult to find in the immediate area within the space of a couple of minutes if you have the Stealth armor (you have to sneak up on them without scaring them). It’s well worth your time, because Kima will trade you the chest piece of the Flamebreaker set for them. This will save you 600 Rupees.
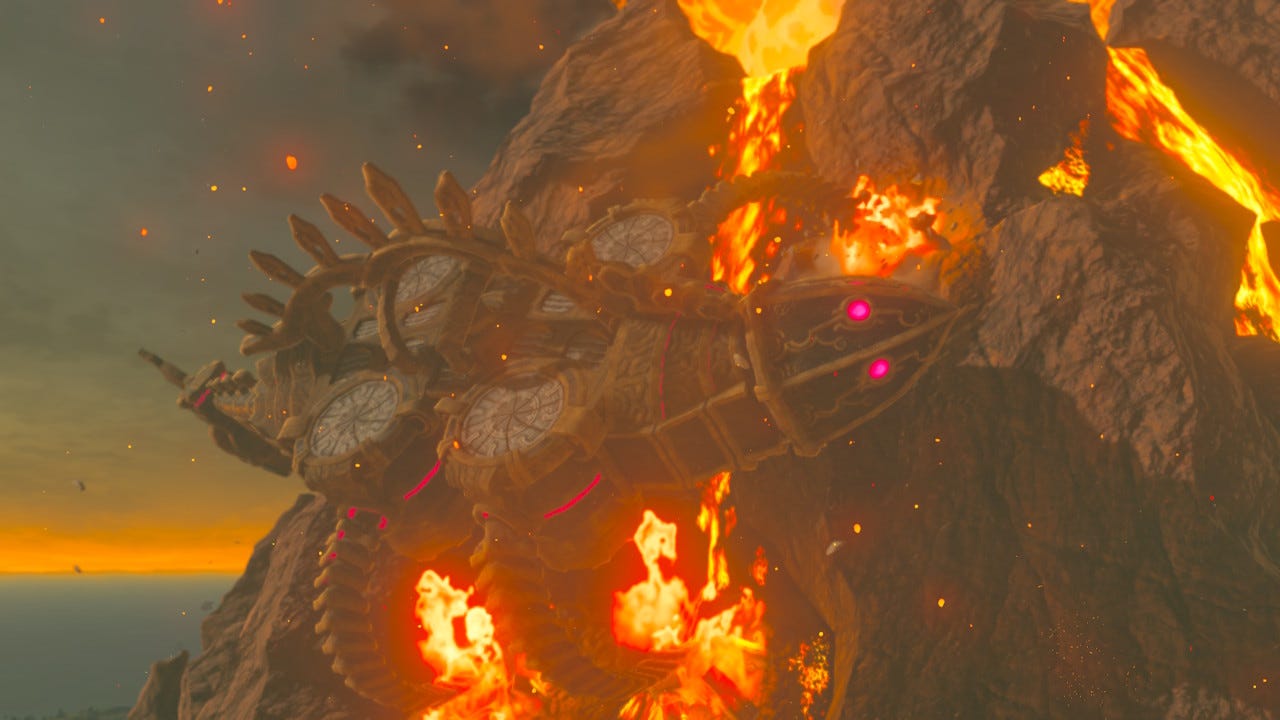
As Link approaches Goron City, the ground begins to shake and the sky begins to rain fire. Fortunately, there’s a rock overhang nearby, so run to that and wait it out before continuing into the city.
Vah Rudania is climbing along the side of Death Mountain, apparently causing this eruption of plasma bombs.
Link enters the city—immediately recognized by the guard outside, which tells us that, like the Zora, Gorons have very long lives. The first stop should be the armor shop to buy the rest of the Flamebreaker armor. Seriously, just get it over with. I couldn’t afford it when I walked in without selling a bunch of gemstones first. I had a Sapphire, a Ruby, and a few Opals, so…
From here, Link goes to meet with Bludo—chief of Goron City, or roughly the equivalent of the “King” of the Gorons.
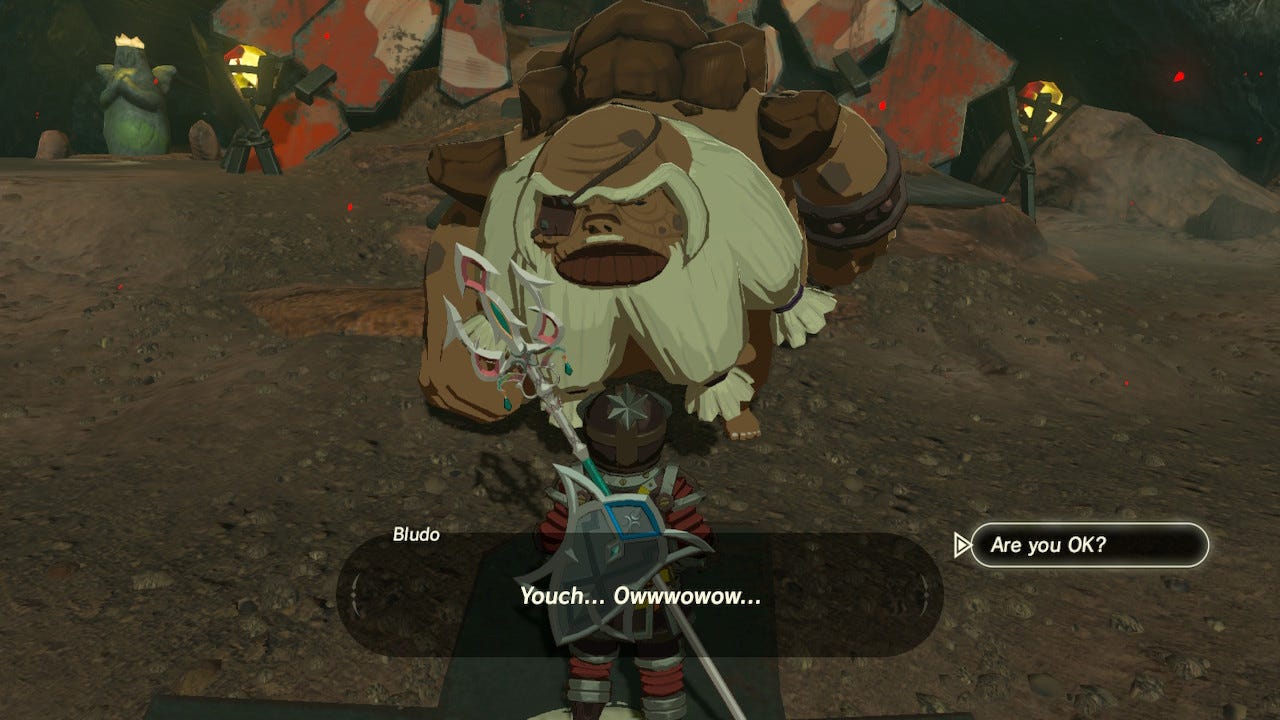
Bludo has one eye and a bad back. I thought this was so clever. It plays into the esoteric symbolism of the element, including its blending of Earthen and Fiery influences.
We’ve looked at different systems of Initiation and how they’re expressed in external, stellar and planetary terms, but they can also be viewed inwardly; for example, the Tree of Life can be projected onto the human body and all sorts of correspondences made. And of course, there are the “chakras,” which we Westerners associate with the New Age and/or with “tantric” Initiatory systems; the 7 chakras are another lens to use for viewing the 7 Sisters we’ve discussed, for example. This comes from Kundalini Yoga. In this system, we can describe the raising of consciousness as the sequential opening of the 7 chakras, which run up and down the…spine. The idea is that an energy called “Kundalini” lays coiled up in the “bottom” chakra, the root chakra, and once activated, it rises up the spine toward the uppermost center at the top of the head. Like rising up the Tree of Life, there are certain major points along this journey.
There are many warnings about this, especially in literature likely to be read by laypeople, because this process can be dangerous. Supposedly, one potential problem that can happen with premature Kundalini awakenings is muscle and body aches, especially along that spinal column there. That’s actually pretty tame compared to some of the horror stories you hear in some circles (people exploding and stuff).
This kundalini energy is described sometimes as “fiery” and sometimes more as “electric,” or sometimes as “molten lava.” In fact, if I remember correctly, some traditions say that the energy we call “kundalini” originates at the center of the earth in a different form before rising up into us.
So all of this fits extremely well with what I have done with the elements here up North.
So, Bludo’s back hurts and he needs his medicine. Where to get it? Apparently, Bludo’s son, Yunobo, went to retrieve it from the Abandoned North Mine (I don’t know why Bludo’s painkillers would be in an abandoned mine, but I didn’t draw the map).
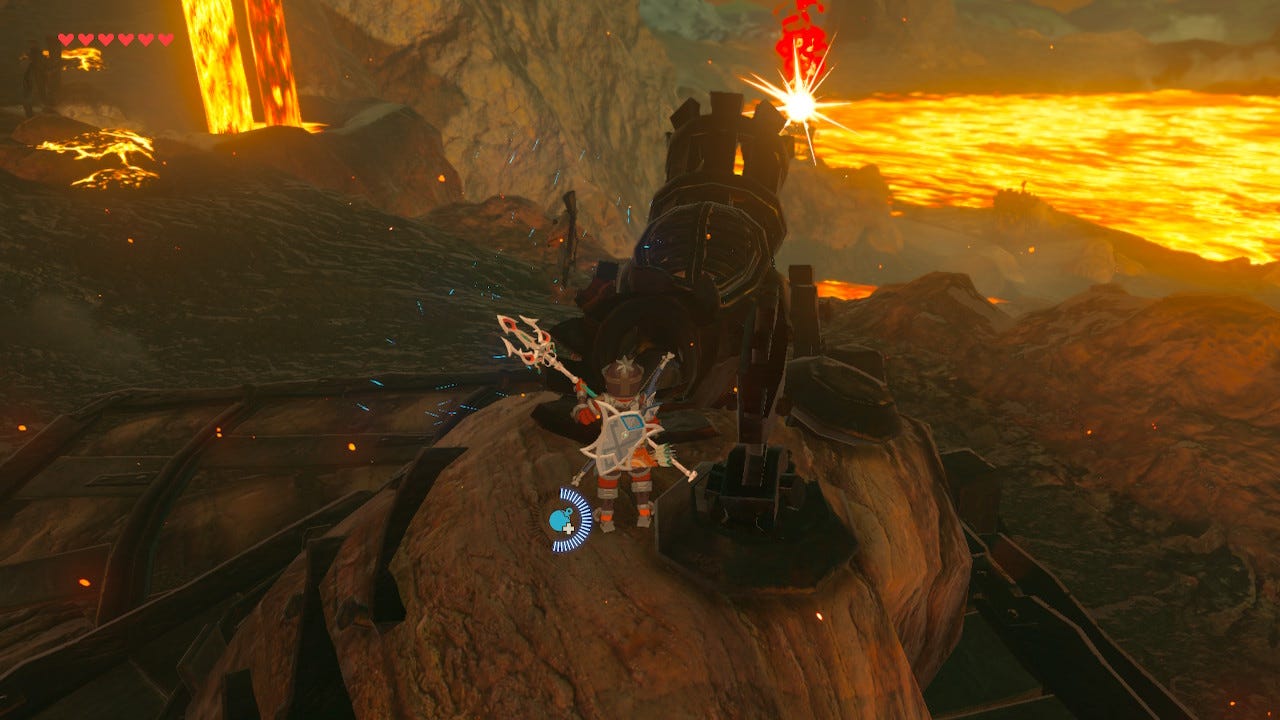
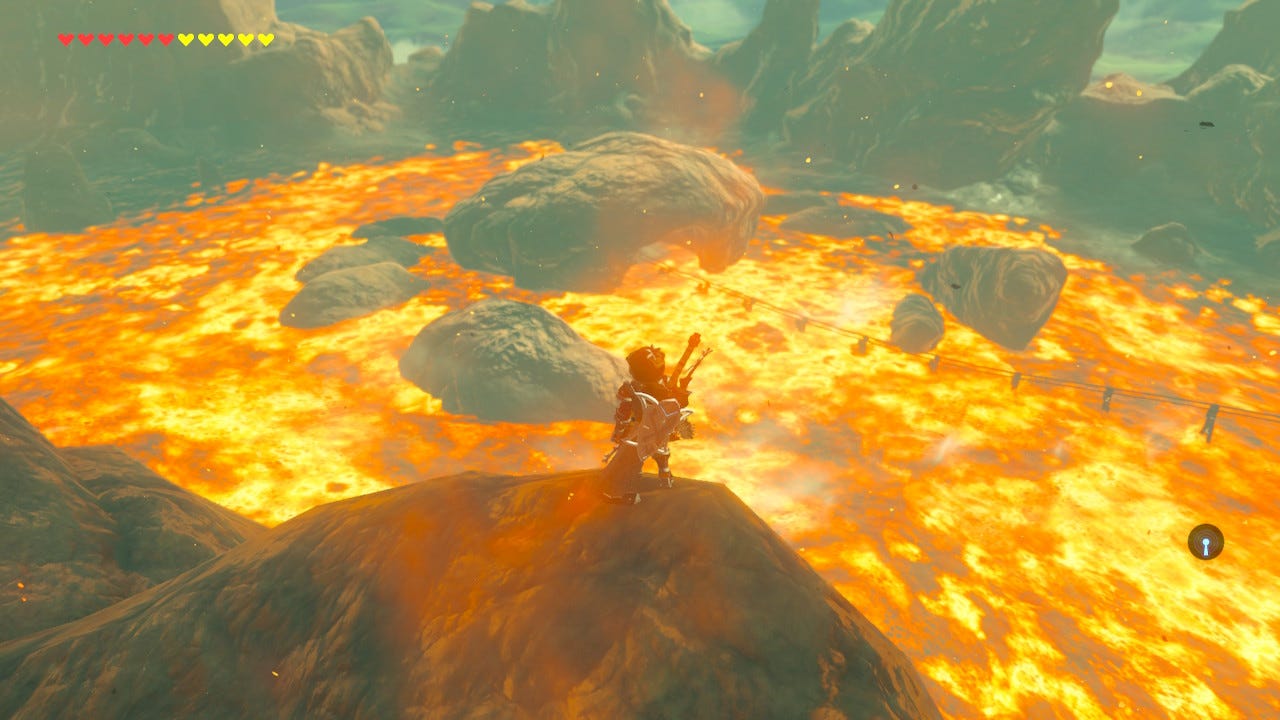
Link goes there for what turns out to be one of the game’s more enjoyable little minigames. To get to where Yunobo is, Link needs to traverse a large lake of lava with occasional rocky outcroppings jutting up and housing Lizalfos to muck up his progress.
There are “cannons” along the way, which are more devices for Link to drop Bombs into. Each one also has a switch Link can activate with a weapon (fortunately, these strikes do not incur damage to weapons) which causes it to rotate. If Link drops a bomb into the cannon funnel and detonates it, the canon will fire, which Link uses here and there to destroy towers housing Lizalfos who are shooting fire arrows at him. It’s really satisfying watching the cannonballs hit.
Eventually, Link makes it to a central island with a storeroom that’s apparently closed in by a rockslide. Aha. Link hits it with a cannon, freeing Yunobo, and then goes to talk to him. He looks so cute all huddled up in his little magic shield—Daruk’s Protection. He thinks Link is a monster and he’s afraid.
Typical.
Yunobo makes introductions brief, as he’s going to be in hot water with Bludo if he doesn’t return quickly with his painkillers.
Let’s talk about this ability, “Daruk’s Protection.” Clearly, it’s a shielding ability. It can withstand just about anything, and Yunobo here puts it to use in the defense of Goron City from attacks by Vah Rudania: There are more cannons up on Death Mountain, and Yunobo will roll his ass up into a ball, activate his shield, and let Bludo fire him out of cannons at Vah Rudania! Apparently, it’s the only thing powerful enough to scare the Beast off.
I can’t tell for sure, but I think this shield is shaped as an icosahedron, a Platonic solid. If so, then its elemental attribution is a bit “off;” the Platonic solids are attributed to the elements, and this one gets Water, which is neither Earth nor Fire. However, as a general property, it also represents the fundamental unity of all matter, and in that sense it fits in very well with the meanings connecting the North with The Hierophant and Path 16.
However, the shield is really otherwise more a manifestation of Path 18, The Chariot—Path 16’s opposite. To explain, we’ll review symbolism already once explored.
The Hebrew letter attributed to The Chariot is Cheth, meaning “fence.” Another translation for the word is important: “Field.” In this context, it refers to the thing that a fence typically surrounds—an actual field of the Earth, like a plot of land.
However, the word “field” has broader and even abstract meanings, especially in the field of physics (no pun intended), where it can signify a “pocket” or “pouch” of…pretty much anything. It’s a designated area of 3-dimensional space, very often conceived of as a spherical one but not necessarily so. A “force field,” like Daruk’s protection, is just one example. An electromagnetic field is another that comes to mind, which covers an area of space that has defined boundaries.
This perspective differs sharply in emphasis from that of The Hierophant, because here, there is a designated entity called “you” that also has boundaries and limitations, which contrasts sharply from “not-you.” “You” must, by definition, be defined by some kind of field.
This perspective emphasizes separateness over union, which stands to reason since this path connects the sphere of Mars (cutting, piercing, separation) with the sphere of Saturn (boundaries, limitation, death or endings).
To express the difference between Paths 16 and 18 in a single sentence: Path 18 says, “I am in my body,” while Path 16 says, “I am my body.” On Path 18, the body is like a “vehicle” that consciousness “rides” within or “inhabits,” whereas on Path 16, consciousness is one with the body; the body is what consciousness becomes.
As discussed in Threading the Eye, the Zora chestplate plays on this symbolism in ways that connect with the zodiac sign of Cancer. Recall that this same sign which we modern Westerners recognize as the Crab was also recognized as the scarab god, Kephra, who carried the Sun across the sky.
The coolest thing happened while I did this quest. By this point in the game, I had already long seen it coming and was getting excited by it:
In order to pull The Master Sword, Link must have a minimum of 13 Heart Containers (notice the lunar symbolism), because that’s how many hearts he will lose in the attempt to pull The Master Sword from its pedestal.
The minimum number of Sheikah Shrines Link must complete in order to do this is 40, regardless of whether he takes Stamina or Heart Container upgrades along the way (because he can always max out his Heart Containers by bargaining with The Horned God).
As I parted ways with Yunobo, I’d completed 39 Shrines—and there’s also one right by Abandoned North Mine.
In fact, if you’re going to make a Sheikah Shrine your 40th Shrine before pulling The Master Sword—especially in a ceremony like this one, with all of its esoteric meaning—this would probably be the best one. This is also right before I go in and cleanse the final Divine Beast, so the timing is pretty much perfect.
It’s one of my favorite Shrines because of the symbolism surrounding it, and I’ve always known it fits into the bigger picture in important ways, and have spent a lot of time puzzling out how. Never really figured it out, but now a really good answer (not “the” answer—that’s the cool thing about doing magic(k) in open world games—but it is “an” answer that works awesomely well, yes) presents itself.
Shora Hah Shrine.
Where is it located?

No joke, it’s inside this fucking crab-shaped cave, baby! Rising up from the lava of Death Mountain, determined to prevail over the consuming heat, this little landmark embodies the very meaning of Xeper, The Eternal Word of Set.
I didn’t plan this, and I couldn’t have planned it better if I tried.
How close? This close. You’ll notice on the map above that there are a set of tracks leading into it, as it’s normally accessible by mine cart, but I figured I could probably easily paraglide to it. I had never tried before! Well, I did it this morning.
And what’s the name of the Shrine Quest inside?
This is so cool:
“The Blue Flame.”
This harkens back to “The Blue Flame Working,” which I detailed in the post Set Flame to the Night. Basically, the Blue Flame has been a thing in Zelda ever since the beginning about 40 years ago (heh) and also appears in this game; it is also the color of flame almost every Ceremonial magician learns to use for the Lesser Banishing Ritual of the Pentagram. I performed an honest-to-gods magic(k)al working one night using the quest for Link to light the furnace at Hateno Ancient Tech Lab with the Blue Flame; the symbol logic was that, magic(k)ally speaking, the Blue Flame in-game was a stand-in for The Black Flame of Ipseity, which is a symbol for human consciousness, intelligence, and self-determination. By “lighting the furnace with the Blue Flame” in-game, I was consecrating” Breath of the Wild with the Black Flame in my magic(k)al world, or in my Personal Myth. After that, I did one better, and carried the Blue Flame (i.e. Black Flame) all the way to the nearest Sheikah Tower, and used it to burn away the brambles. Returning to the earlier discussion about kundalini yoga, the symbolism there was very much to envision the tower as my own “sushumna nadi” rising up my spinal column, the flames burning away the brambles signifying the dissolution of all blockages and removal of all locks, allowing my kundalini to rise.
That was just for laughs, honestly.
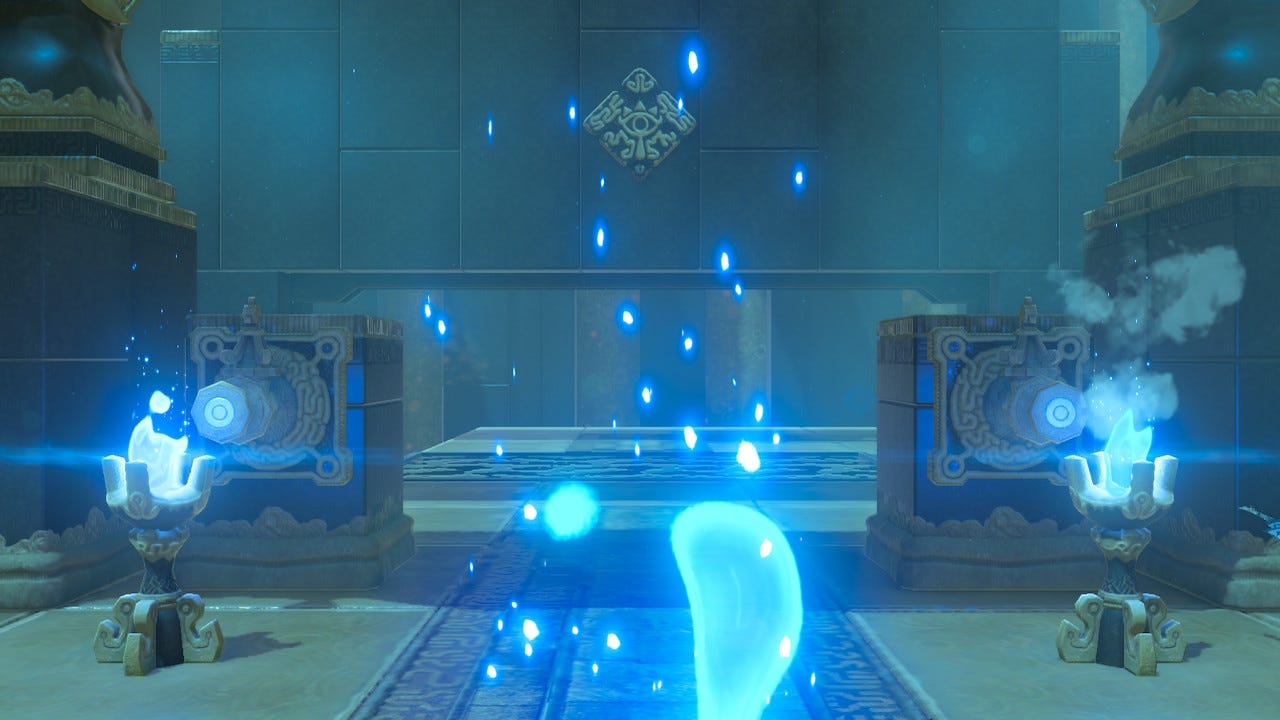
The quest within this Shrine is actually very similar to the “marathon” in that working; Link has to carry the Blue Flame, variously using a torch and fire arrows, through a death-defying obstacle course. At the very end is a reiteration of the eightfold (7+1) symbolism connected with Ursa Major that has been discussed at various points in our journey: There is a circle of seven torches with an opening where an 8th would fit, and that 8th is “set off” from the rest. The goal is to get them all lit at once, but if one of the 7 is lit, water pours out from 7 spouts aligned with each of the torches to put them out. The only way to succeed is to light all 7 at once.
The solution is to light that 8th torch, then press the “attack” button and hold it down to charge up a swing attack with the lit torch; then go stand on the center tile and let it loose. Link will unleash a spin attack that lights all 7 torches at once with the Blue Flame.
Or Black Flame. Right?
Again, the way the timing of this worked out with the symbolism involved was not planned ahead but was oh-so-sweet once I saw that it was about to play out that way: Set is, once more, that 8th torch separated from the other 7; those 7 symbolically form the “womb” from which Set cuts himself free.
I am also at the end of this elemental ceremony, and the point at which, symbolically, the unit of consciousness that developed through Water, Thunder, and Wind is now born into physical manifestation in “Earthfire.” It’s notable that the actual quest is built around the Blue Flame, because that’s the flame one is advised to use in earthly magic(k) unless there’s very specific intent otherwise; the Red and Black Flames are both things of The Abyss.
And with what instrument will this Set cut his way forth into the world, rending the veil that separates the two?
With The Master Sword, which Link has been empowered to pull by completing this very Shrine.
So It Is Done!
Scaling The Peak
After Link returns to Goron City and speaks to Bludo, he learns that Yunobo has already left to mount another assault on Vah Rudania after speaking with Link. Bludo had intended to go and aid him, but suffers another back attack while speaking with Link. He asks Link to go in his stead…which is well and good, since there’s no way Bludo would have pulled it off now if he couldn’t do it before anyway. That’s why Link is here. This is his job.
Link travels to Eldin Bridge to meet up with Yunobo, who is presently under attack by Moblins. I found Urbosa’s Fury to be quite useful here; it took away half of their health and stunned them both. Mopping up one of them was easy because he remained stunned; for the other, I happened to be using a Thunderblade, so he ended up stunned again anyway!
Eldin Bridge has been raised, so it needs to be lowered. That’s why Yunobo was here; so he could be fired at the bridge from the cannon nearby, which will lower it. We get a nice shot from below as it falls and if I didn’t know any better, I’d conjecture that this bridge doubles as an idol for a Spirit of Place.
With the bridge lowered, Link and Yunobo cross it and another fun cannon-based minigame ensues.
Rudania, noticing the lowering of the bridge and the approach of Link and Yunobo, releases a swarm of drones, which…apparently…this Divine Beast has.

The arrangement here is that Link will scout ahead, taking care of any drones or other threats along the way, then whistling for Yunobo when the coast is clear. I usually enjoy myself here. It’s set up to be kind of a stealth sim, but I also usually have plenty of Stamina by the time I do it to climb up and just use the large metal blocks to destroy the drones that we would otherwise need to evade using clever tactics and timing.
Along the way are three separate cannons. Each time we reach one, Link fires Yunobo at Vah Rudania again, driving him farther up Death Mountain.
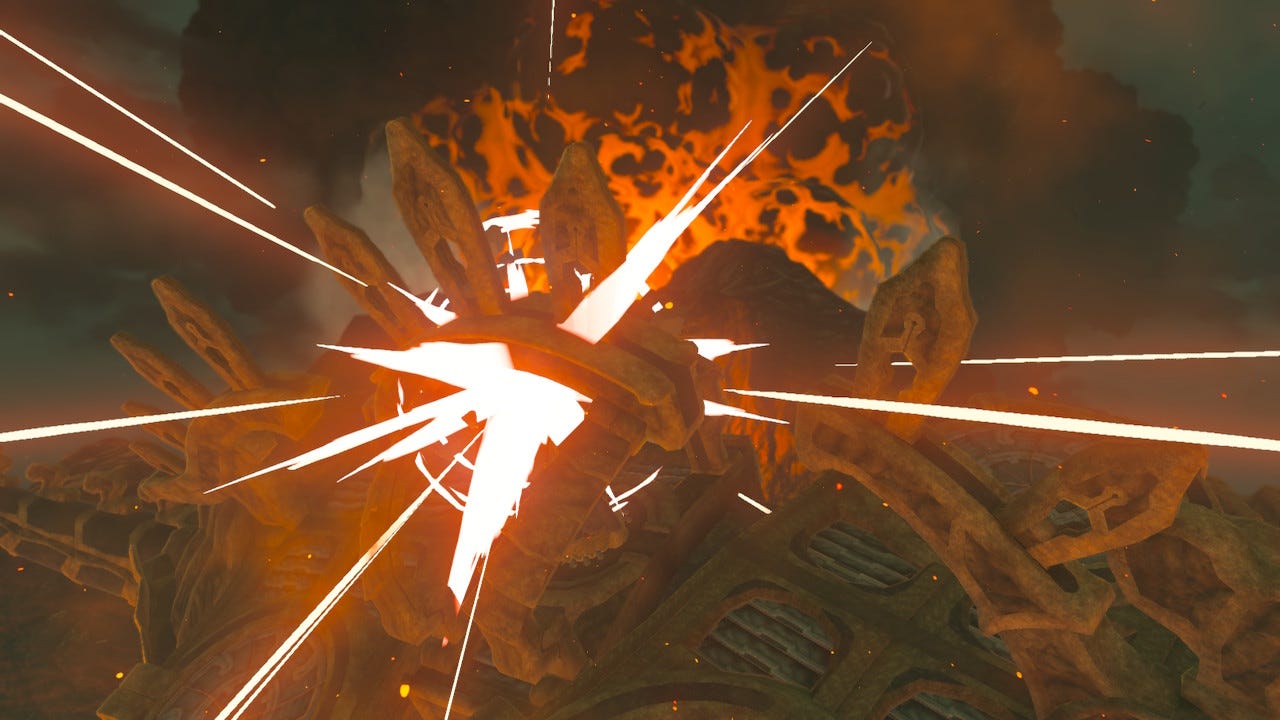
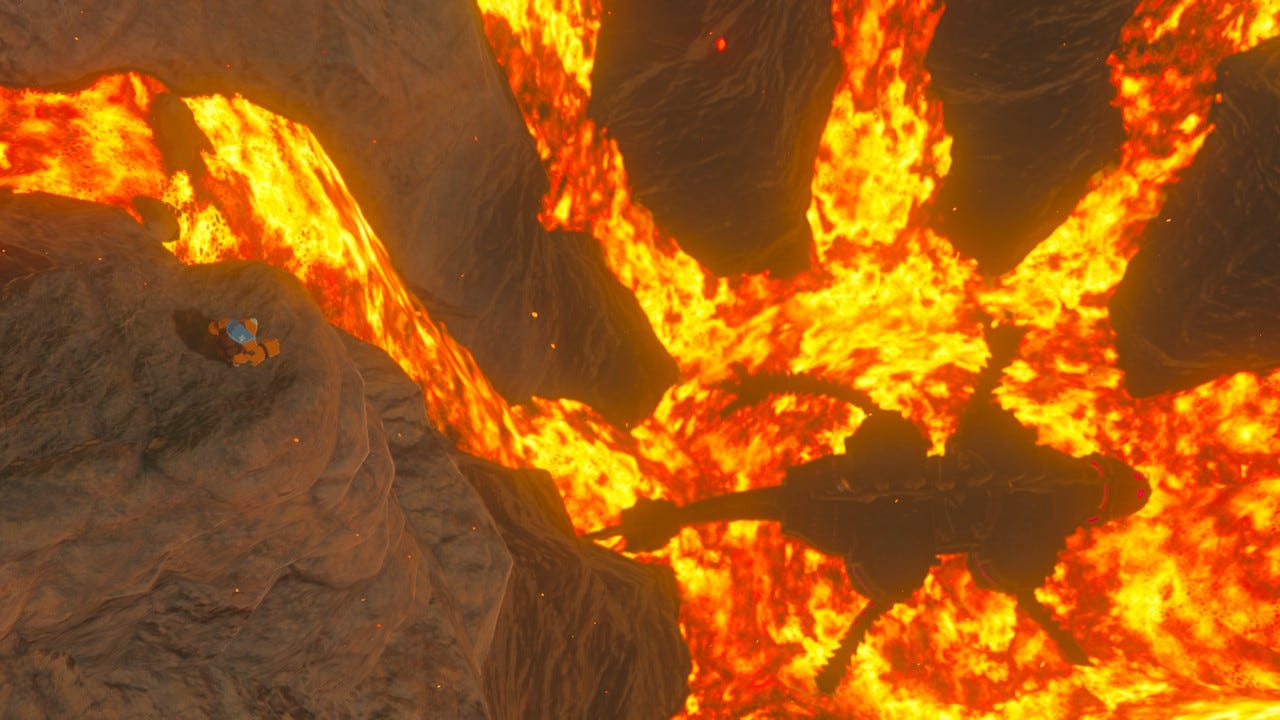
After the third shot, Rudania panics and takes a dive over the edge, into Death Mountain’s caldera.
And Link follows him down.
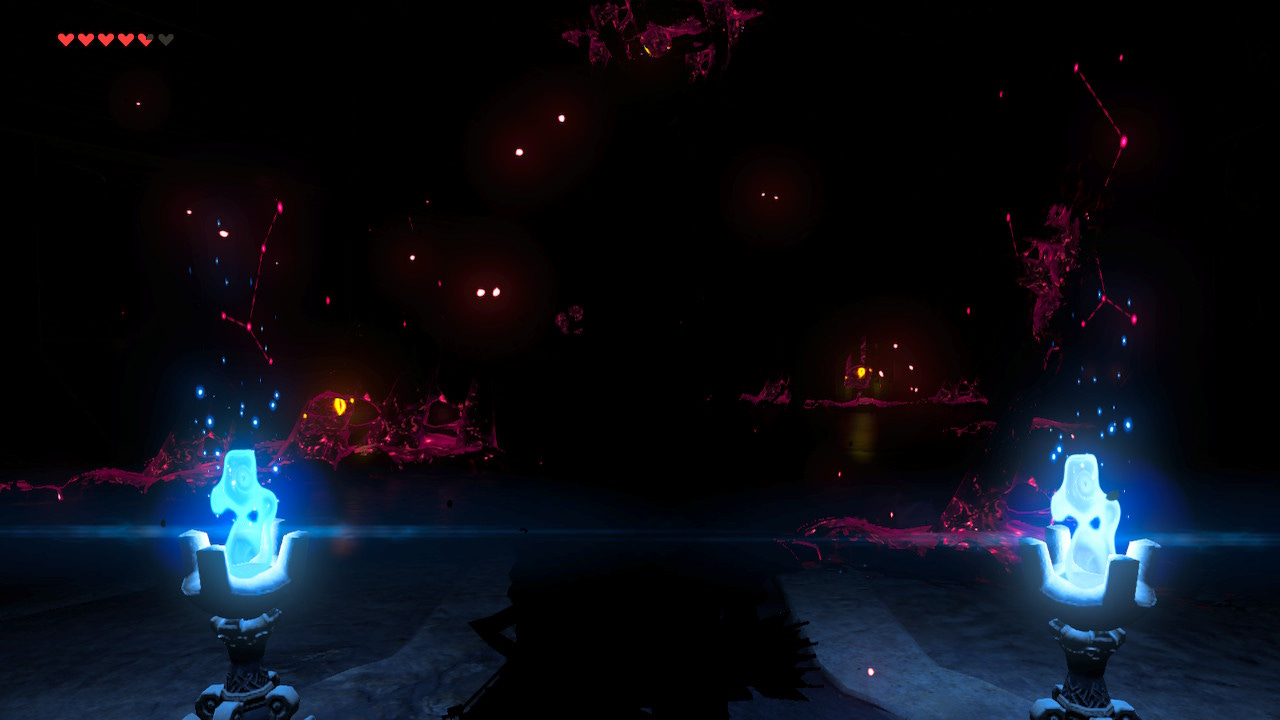
This Divine Beast is a bit unique. For one, it starts out pitch black inside the Beast until Link activates the Guidance Terminal. Making his way through the first few chambers using the Blue Flame is a fun and beautiful part of the game to play. Once Link activates the Guidance Terminal, however, bay doors open, and Rudania’s interior is lit by the ambient light from all of the lava surrounding it.
Rudania’s mechanic takes some getting used to, as well: It’s called “Rotate 90°" and it causes Vah Rudania to…rotate about 90°. That is, it’s normally upright, but when “rotated,” it’s like Rudania decides to climb up onto the wall of the crater and walk horizontally on that: The entire temple rotates and it shifts the orientation of everything.
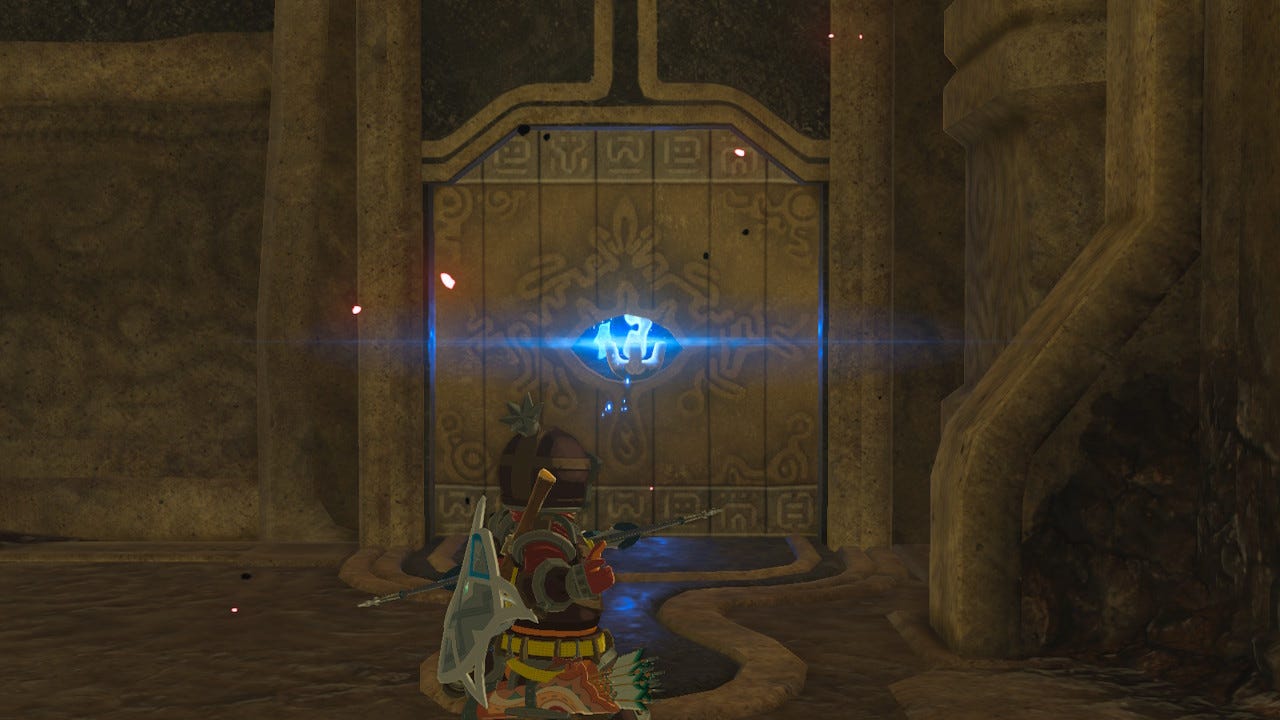
One of my favorite parts is opening the door into the room with the big metal cube, because it involves lighting torch by firing an arrow with the Blue Flame through an eye-shaped hole in the door, where the torch itself forms the “iris.”
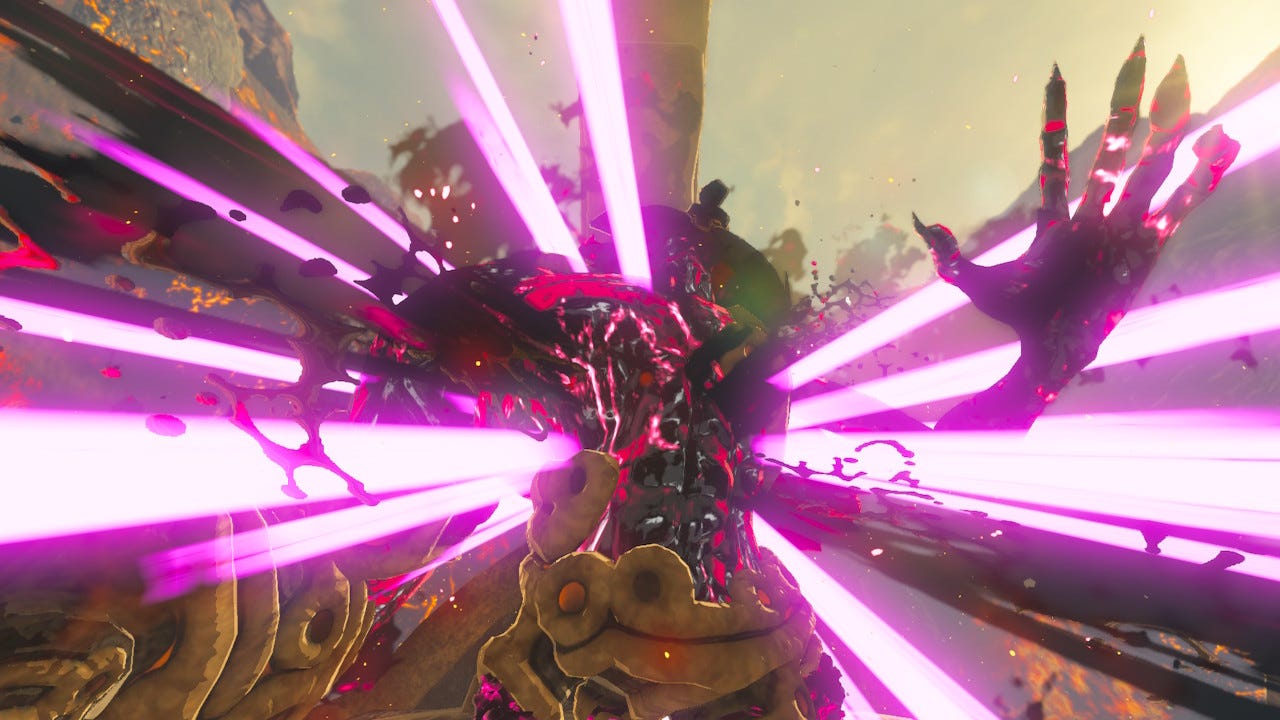
As usual, there are 5 terminals. This being my 5th time through the game, I’ve got a lot of this stuff pretty much down, but this is still the Temple that disorients me the most. One or two of the puzzles took me three or four rounds of solving before I actually retained memory of said solutions. All in all, though, it’s a pretty good time. And before long, it’s done, and Link travels up to Rudania’s back to activate the big Garlic Terminal. As usual, out pops a Ganon.
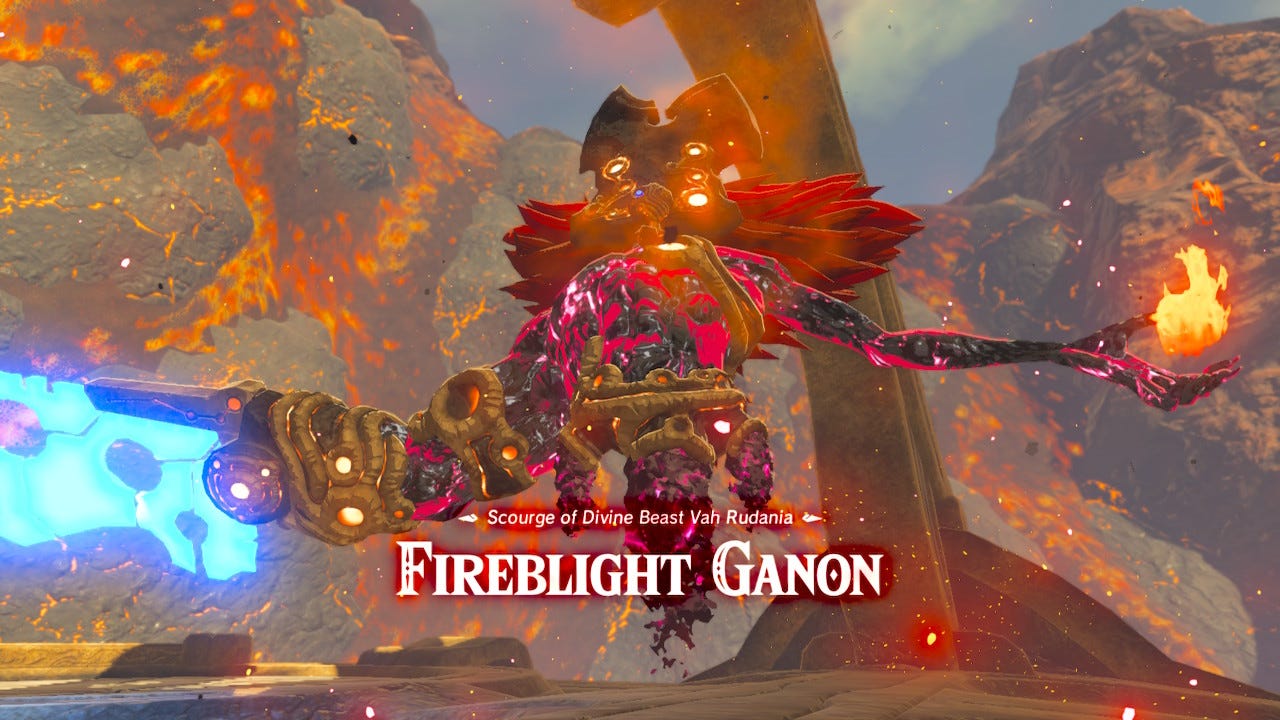
This is an easy fight, especially with Urbosa’s Fury. I just walk right up to him, hit him with Fury, and that knocks him down so I can unleash a full volley of attacks. For this fight, I equipped Edge of Duality, a 50-damage two-handed claymore that I picked up in the Shrine near Hyrule Field Tower. I thought it would be highly symbolically fitting to defeat the final Blight Ganon, who corrupts the element that serves as the gateway into manifestation, using a weapon called “Edge of Duality.”
If you know what I mean.
But yeah, the fun thing with Two-Handers is having three full wheels of Stamina and being able to rack up hits with Link spinning around like a top, swinging his sword with him.
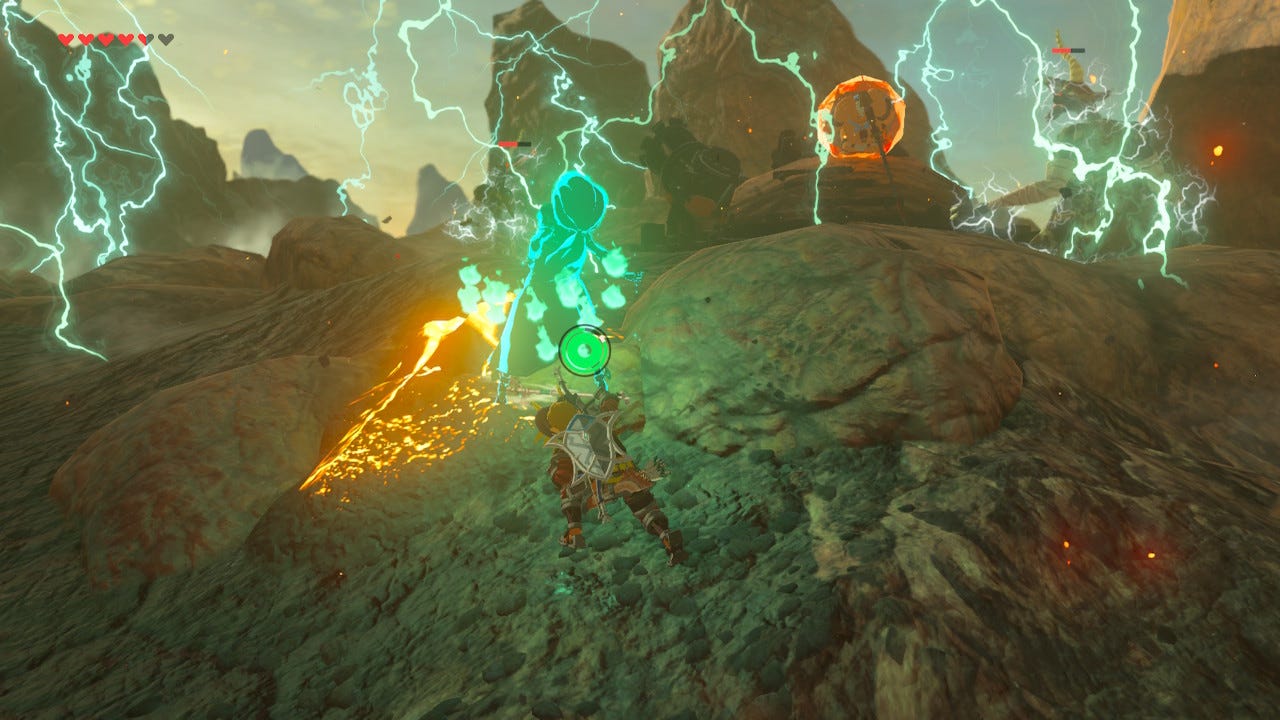
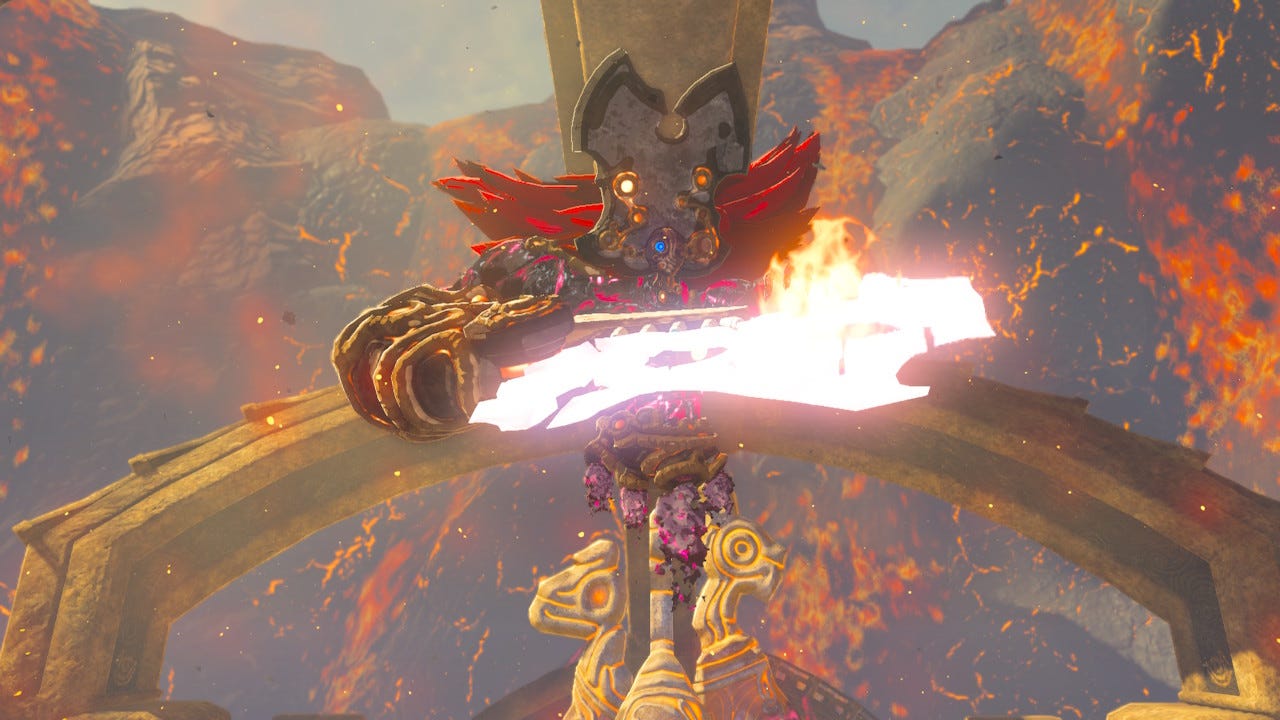
About halfway through the fight, Fireblight indulges in the most pointless flex ever, using his power of Fire to heat up his axe blade (which is made of energy and would totally ravage Link in any case). Then, he puts up a shield of his own!
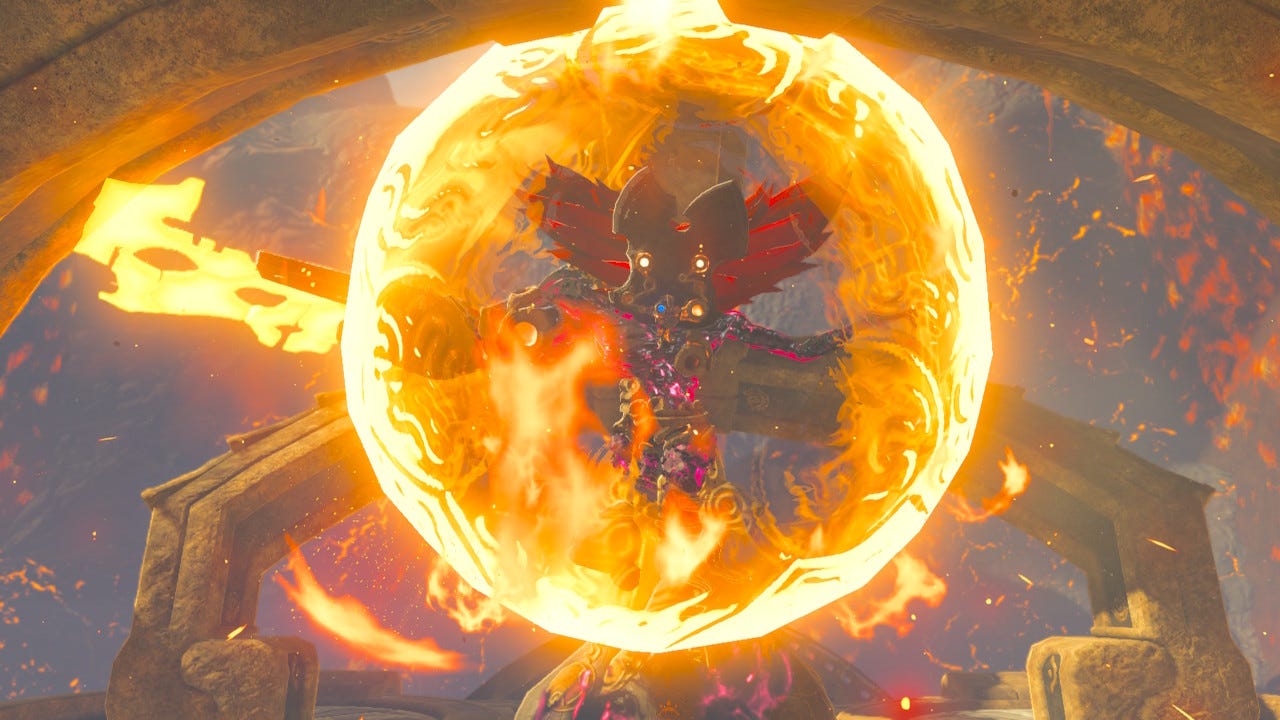
He’s even easier to beat in his second phase once you know the trick.
He backs off and raises his shield and all sorts of energy starts building, which gets unleashed in an attack if you let it.
But if you pull out a Bomb, it will get sucked into the vortex. And then when you detonate it, it interrupts Ganon’s process and knocks him back so Link can take a few swings.
Two runs and he was down.
Daruk appears to congratulate and thank Link. He’s kinda cool. Very “Big Brother” energy, or maybe “Uncle” energy. He runs through the final plan with Link one more time; he sounds excited to get things underway and highly confident in Link’s ability to do what must be done. It’s not even a question in his mind.
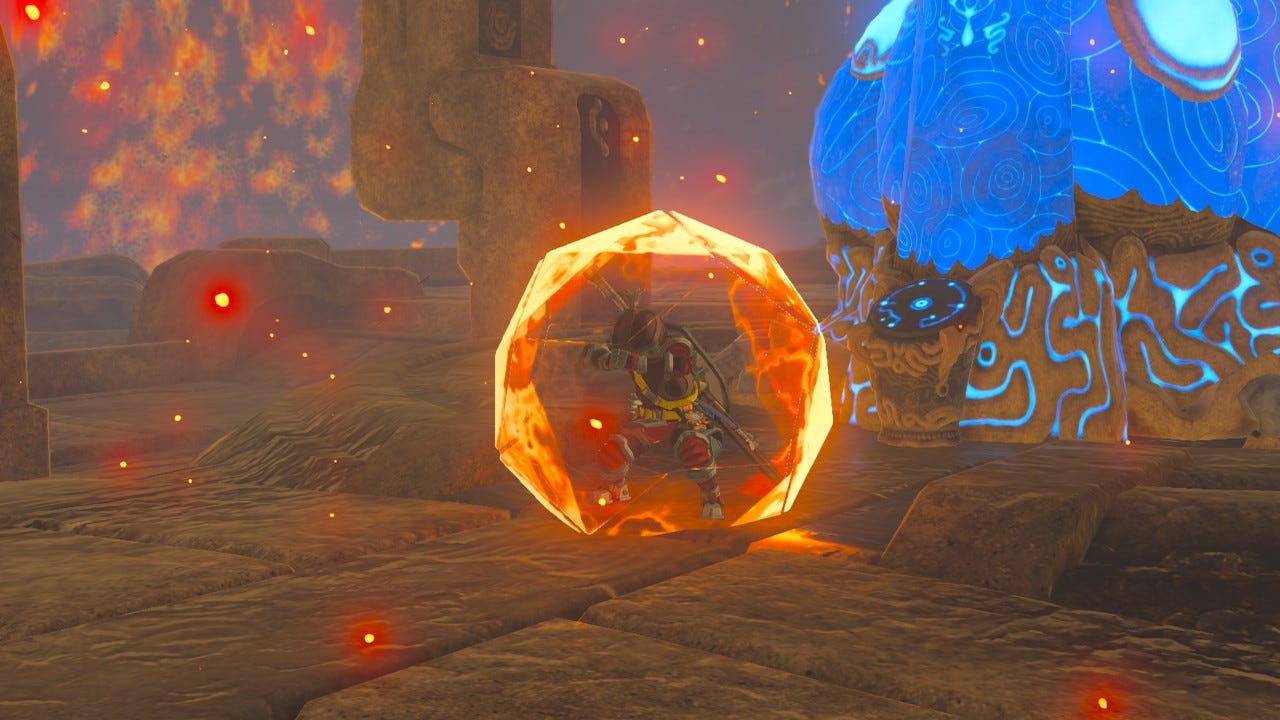
He gives Link his shield-raising ability, Daruk’s Protection. When active, this ability is fused to the “Raise Shield” button and becomes indistinguishable from that function, which is both a blessing and a curse.
It makes using Daruk’s Protection—when you want to use it—quick and convenient. Link can raise his shield fast, and the same goes for Daruk’s Protection. It will absorb all damage from one damage source, whether that be an attack from a monster, one of Link’s own bombs, or even fall damage. It has three charges, so can take three hits before it needs to recharge for a while.
The downside is that, being wedded so directly to your shield function, it’s possible to forget the skill is activated and waste charges when you intend to block with your shield, but Daruk’s Protection activates, too. This can be avoided by simply turning the skill off.
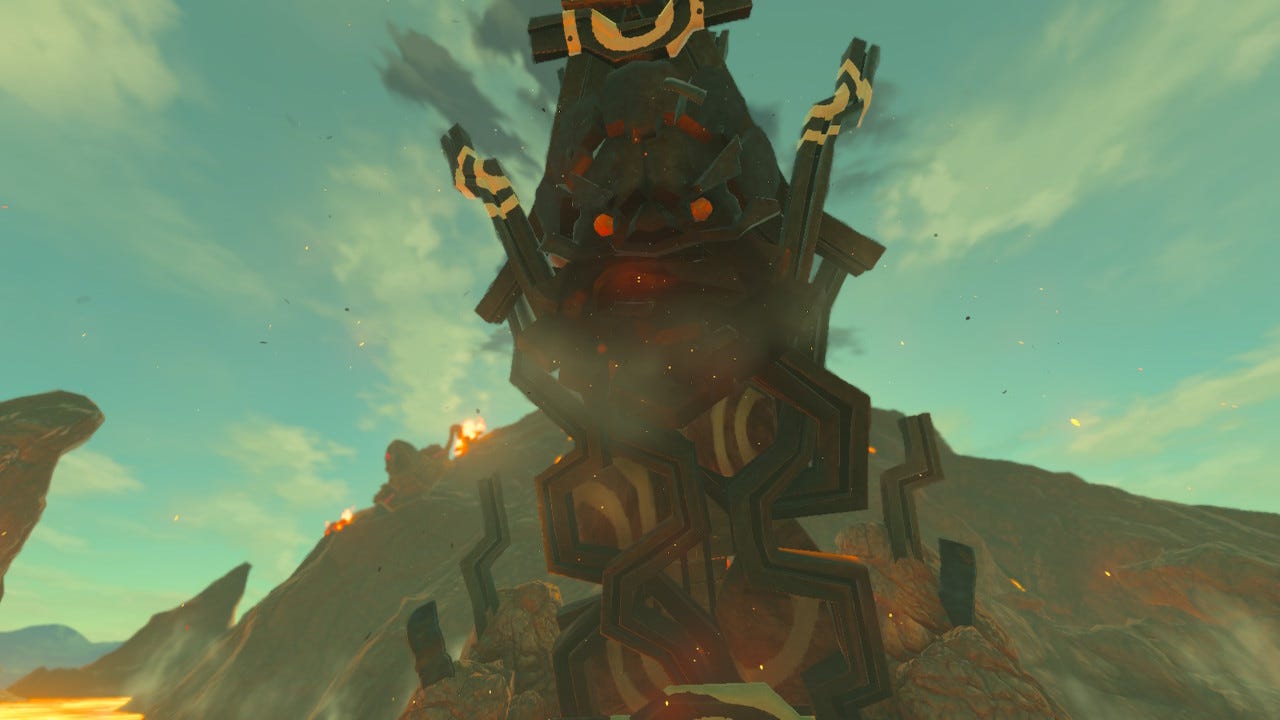
With that, Daruk pilots Vah Rudania to the summit of Death Mountain, where his head opens up into a big “dish” and points a targeting laser at Hyrule Castle.
What a momentous occasion; just in the nick of time, I collected my 40th Spirit Orb and cleansed Divine Beast Vah Rudania of Fireblight Ganon’s corrupt influence.
Stepping back to reflect on the overall journey, I feel a deep sense of peace and satisfaction at a job well done. I also feel blessed to be the recipient and bestower of that which the process has revealed: Now that all of this meaning has been conveyed, there is still quite a bit to do. Remember, my friends: This is all active magic(k)al work—and the game isn’t over yet!
In the previous post, I mentioned that this year is a Jubilee Year for the Catholic Church, and that it will be commemorated this year via a ceremony involving the opening of 5 doors. As part of my preparation for today’s working, I did some more research about this to learn about its symbolism.
Ever seen Dogma? That movie where a couple of fallen angels nearly cause the apocalypse by exploiting the “Plenary Indulgence Loophole,” which dictates that whatever the Pope holds true on earth, God must hold true in heaven? Then the two angels, who had been sentenced to eternity in limbo by God, walk through the door of the New Jersey Cathedral on the appointed day, thus cleansing them of sin—which proves God wrong, which is such a paradox that it causes a cosmic “system crash.”
This is that ceremony! These are those doors.
Well. There are 5 of them, that’s all I know.
And I know that although I just finished cleansing the Divine Beasts and in the base game, the main task left to do is to Defeat Calamity Ganon…I have the Champion’s Ballad DLC, which means I have a new quest where I’ll need to fight all of these Ganons again…but then I’ll be given access to the secret, 5th Divine Beast. Inside of that Temple, there just happen to be 5 doors—one for each of the four elements, plus a fifth one leading to the Shrine’s Monk, Maz Koshia.
I wonder what will happen if I open them on Christmas Eve?
 | A guest post by
|